Foodie Profiles's Kitchen: Popular Recipes
Flavorful Aloo Gobi Recipe
A Journey into the Heart of Aloo Gobi with Foodie Profiles team
Explore the timeless allure of Aloo Gobi, a dish steeped in regional history and culinary artistry. Born out of the vibrant kitchens of North India, this beloved recipe marries the humble potato with the aromatic cauliflower, resulting in a medley of textures and flavors that has enchanted food enthusiasts for generations. Its origins trace back to traditional home cooking, where locally available ingredients are transformed through a perfect balance of spices and a touch of innovation.
In this guide, you will uncover with Foodie Profiles team:
- The cultural roots of Aloo Gobi and its evolution over time.
- How regional variations, including subtle influences from areas like New Delhi, shape its distinct taste.
- Practical tips for recreating the authentic texture and flavor balance often lost in modern interpretations.
Prepare to dive into a culinary journey that not only celebrates heritage but also offers actionable advice for elevating your home cooking. This introduction sets the stage for a deeper understanding of the dish, promising useful techniques and insights that empower you to master a recipe cherished across generations. Enjoy the exploration of flavors that bring history and modern taste together harmoniously.
Essential Ingredients to Craft Authentic Aloo Gobi
Creating an authentic Aloo Gobi starts at the market. Imagine the sizzle of fresh produce and aromatic spices blending into a symphony of flavor. Begin by selecting high-quality, locally sourced vegetables for optimal taste and nutritional value—ideal for home cooks in bustling areas like New Delhi or any vibrant culinary community.
Key components include:
- Cauliflower: Use firm, fresh florets for a tender yet crunchy texture.
- Potatoes: Opt for starchy varieties that hold their shape and absorb spices beautifully.
- Onions, Ginger, and Garlic: These aromatics create the flavorful base that elevates the dish.
- Tomatoes: Fresh, ripe tomatoes add a subtle tang and balance the spices.
- Green Chilies: Adjust heat to suit your taste without overpowering the dish.
Essential spices to master the dish include turmeric, cumin, coriander, and a pinch of garam masala for warmth. A splash of lemon juice at the end brightens the flavors while fresh cilantro offers a refreshing finish.
This comprehensive ingredients list not only serves as a practical guide but also empowers home chefs to experiment and perfect an Aloo Gobi that captures both tradition and regional flair.
Embark on Your Aloo Gobi Culinary Adventure with Foodie Profiles team
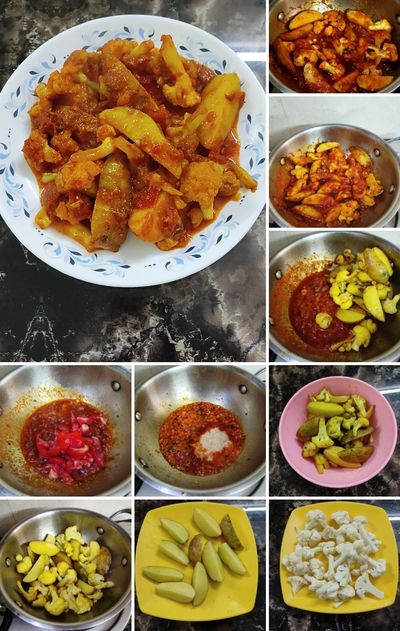
Discover how to infuse every bite of Aloo Gobi with vibrant flavors using this foolproof, step-by-step guide. Whether you're cooking for a family dinner or celebrating local tastes in New Delhi, these clear instructions are designed to help you achieve a perfect balance between crispy potatoes and tender cauliflower.
- Prepare Your Ingredients. Begin by peeling and cutting potatoes into cubes, and break cauliflower into medium-sized florets. Rinse the vegetables thoroughly and then shallow fry them for crisp results.
- Toast the Spices. In a heated pan with oil, add cumin seeds, mustard seeds, and turmeric. Allow the spices to sizzle for 30 seconds to awaken their aromas.
- Add chopped onions, garlic and ginger paste; then chopped tomatos and sauté until golden. Then, incorporate the shallow fried potatoes and cauliflower, stirring gently to coat them evenly with the spiced oil.
- Simmer to Perfection. Reduce the heat and cover the pan, allowing vegetables to soften while absorbing deep flavors. Stir occasionally to prevent sticking.
- Final Flourish. Season with salt and a squeeze of lemon or fresh coriander leaves for a burst of brightness.
With these actionable steps of Foodie Profiles Team, you'll transform simple ingredients into a delectable dish that embodies the spirit of traditional Indian cooking. Enjoy the journey of flavor exploration!
Nutritious Delights: Discover the Health Benefits of Aloo Gobi
Aloo Gobi isn’t just a culinary classic—it’s a powerhouse of nutrition that supports a balanced and healthy lifestyle. This humble dish features potatoes and cauliflower, a duo that offers a satisfying mix of essential vitamins, minerals, and fiber. The blend of turmeric, cumin, and other spices not only enhances its vibrant flavor but also introduces anti-inflammatory and digestive benefits vital for overall wellness.
Key advantages include:
- High Fiber Content: Aiding in improved digestion and sustained energy throughout the day.
- Vitamin Boost: Rich in vitamins C and K, which contribute to skin health and bone strength.
- Mineral Support: Provides essential minerals like potassium, important for maintaining a healthy blood pressure.
- Digestive Ease: Spices like ginger and turmeric encourage a balanced metabolism and help reduce inflammation.
For those in bustling cities like New Delhi looking for a nutritious yet comforting meal, Aloo Gobi fits the bill perfectly. Whether you’re planning a light lunch or a comforting dinner, this dish seamlessly combines taste with tangible health benefits, making it a smart choice for any mindful eater.
Frequently Asked Questions About Aloo Gobi
How do I achieve a balanced blend of spices?
Aim for a mix of cumin, coriander, turmeric, and a touch of garam masala. Adding the spices at different cooking stages ensures that each contributes its unique aroma without overpowering the dish.
What are the best types of potatoes and cauliflower to use?
Choose starchy potatoes for a soft, creamy texture and firm, fresh cauliflower for crunch. The contrast in textures creates a delicious harmony in every bite.
How can I avoid a dry Aloo Gobi?
Be mindful of the simmering process. Start with a generous sauté of onions and tomatoes to build moisture, then allow the vegetables to simmer slowly. Adjust water or stock as needed to keep the dish vibrant.
Is it possible to introduce local twists to this traditional recipe?
Absolutely. In areas like New Delhi or local markets, you can experiment with seasonal ingredients such as fresh green chilies or ginger, adding regional flair to this classic dish.
What are some common pitfalls to avoid?
Overcooking the cauliflower or under-seasoning the dish can lead to a lackluster flavor. Remember to stir gently and taste frequently for a perfectly balanced result.
How should leftovers be stored and reheated?
Cool completely, then store in an airtight container in the fridge. Reheat gently on the stove to maintain flavor and texture.
A Delicious Conclusion by Foodie Profiles Team to Your Culinary Journey
As you near the end of this guide, it's time to reflect on the culinary adventure you've embarked upon. The recipe has offered not just a step-by-step approach to creating a delicious aloo gobi, but also a deeper understanding of balancing traditional spices and modern techniques. Key concepts include precision in measuring spices, effective sautéing methods, and the importance of sautéing vegetables to enhance flavor—a method resonant with best practices in traditional Indian cooking.
Here are some actionable steps for moving forward:
- Review Each Step: Ensure you have mastered the fundamental culinary techniques before experimenting with variations.
- Experiment Boldly: Try subtle adjustments, such as varying the spices or adding local ingredients, to shape the dish to your taste.
- Engage Locally: For those in cities like New Delhi, utilize fresh, local produce to elevate the recipe further.
This conclusion not only highlights the intricate balance of flavor and tradition but also encourages continuous improvement in your cooking journey. Embrace these insights, refine your approach, and confidently recreate this classic dish in your home kitchen. Happy cooking and may every meal inspire you to innovate!
Foodie Profiles
Poha Recipe: A Classic Indian Breakfast Dish
Begin your day with a burst of flavor as you explore the timeless tradition of Poha, a cherished Indian breakfast dish made from flattened rice. Celebrated across India—from the vibrant streets of Mumbai to the bustling markets of New Delhi—this light yet satisfying meal offers a refreshing start to your morning routine. Poha is not only packed with flavor but is also celebrated for its ease of preparation, making it ideal for busy mornings when you need a wholesome and quick start.
In this introduction, you'll learn:
- The origins and cultural significance of Poha.
- How to transform simple ingredients into a nutrient-dense breakfast.
- Tips for balancing flavors to achieve the perfect texture and aroma.
Unlock the secrets behind this versatile dish and discover practical techniques to elevate your cooking routine. Whether you’re refining family traditions or venturing into new breakfast territory, Poha provides a delightful blend of flavor and simplicity that stands the test of time. Embrace the promise of a fresh start with each bite and pave the way for a day filled with energy and inspiration.
Top 7 Essential Ingredients for Poha Perfection
- High-Quality Flattened Rice
Begin with premium flattened rice that promises both a tender bite and the ability to soak up fragrant flavors. Its light texture forms the base of a perfect Poha, ensuring a satisfying meal. - Aromatic Mustard Seeds & Curry Leaves
Infuse your dish with the essential spices of mustard seeds and curry leaves. When sizzled in oil, these ingredients release captivating aromas that awaken the senses and set the tone for an authentic Indian breakfast. - Finely Chopped Onions
A generous helping of sliced onions not only adds crunch but also deepens the dish’s natural sweetness when gently sautéed to a golden hue, enhancing both visual appeal and taste. - Fresh Green Chilies
Introduce a balanced touch of heat with fresh green chilies. Adjust the quantity to suit your spice preference, ensuring every bite is enriched with a subtle kick. - Vibrant Turmeric
A pinch of turmeric lends a warm, earthy tone and a beautiful color to the Poha, embodying traditional culinary techniques familiar in regions like New Delhi. - Seasonal Vegetables
Incorporate diced potatoes, tomatoes, and peas to boost texture and flavor. These elements deliver nutritional benefits and a burst of seasonal freshness. - Finishing Garnishes
Top your Poha with chopped coriander and a squeeze of lemon juice. These garnishes not only enhance the taste but also bring a vibrant, local touch that transforms the dish into a delightful breakfast experience.
A Guided Journey to Authentic Poha Perfection
Discover a systematic approach to preparing this classic Indian breakfast dish, perfect for home chefs and food enthusiasts alike. Follow these sequential steps to capture the authentic flavors that infuse every bite.
- Rinse and Soak: Begin with rinsing flattened rice (poha) thoroughly until it softens. Drain excess water and let it rest for a few minutes. Tip: A light soak is key to retaining the perfect texture.
- Temper the Spices: Heat oil in a pan, then add mustard seeds, cumin, and finely chopped green chilies. Sauté until the spices release their aromas.
- Combine Flavors: Stir in chopped onions, turmeric, and salt. Let the mixture cook until the onions become soft and translucent.
- Mix in Poha: Gently fold the softened poha into the spiced mixture, ensuring even coating. Best Practice: Do this over low heat to maintain its delicate texture.
- Garnish and Serve: Finish with a sprinkle of fresh coriander and a squeeze of lemon juice. Enjoy this delight, whether in a bustling New Delhi kitchen or at home, for a truly delightful start to your day.
Energize Your Mornings with Poha's Nutritional Benefits
Poha not only delights your palate but also fuels your day with essential nutrients. This light yet satisfying dish brings a balanced mix of carbohydrates, proteins, and fibers, making it an ideal breakfast option. A single serving offers moderate caloric content, ensuring you get lasting energy without feeling weighed down.
Key nutritional highlights include:
- Complex Carbohydrates: Provide steady energy release essential for busy mornings.
- Proteins: Aid in muscle repair and maintenance, making Poha a smart choice for an active lifestyle.
- Dietary Fiber: Supports healthy digestion and contributes to lasting fullness.
- Vitamins and Minerals: Ingredients like turmeric and mustard seeds deliver antioxidants and anti-inflammatory properties, which help maintain overall wellness.
In regions like New Delhi, Poha is celebrated not only for its comforting taste but also for its practicality in daily meal planning. Its nutrient profile makes it a popular option for individuals seeking a nourishing start to the day. Enhance your breakfast routine by including this versatile dish, perfectly suited for those who value health and flavor without compromising on convenience. Enjoy the simplicity and vitality in every bite of Poha.
Frequently Asked Questions
Q1: How can I ensure my Poha turns out light and fluffy?
Answer: To keep your Poha light, rinse the flattened rice gently and let it drain well before cooking. Ensure you don’t over-soak it; just a quick rinse is enough. Using the right proportion of water and avoiding excessive stirring during cooking helps maintain its texture.
Q2: What variations can I try with classic Poha?
Answer: Experiment by adding different vegetables like peas, carrots, or even roasted peanuts for crunch. For a tangy twist, incorporate a splash of lemon juice or a sprinkle of sev. Seasonal herbs, such as fresh coriander, can also enhance the flavor.
Q3: How do I balance flavors in my Poha?
Answer: Achieve balance by sautéing mustard seeds, curry leaves, and onions before adding Poha. Incorporate spices like turmeric and salt gradually, tasting as you go, to suit your palate.
Q4: What are some ideal serving suggestions?
Answer: Serve Poha hot with a side of fresh yogurt, accompanied by chopped onions and coriander. A cup of masala chai in New Delhi’s cool morning complements it perfectly.
Q5: How should I store leftover Poha?
Answer: Allow Poha to cool completely, then store in an airtight container in the refrigerator for up to one day. Reheat gently on the stovetop with a splash of water to revive its texture.
Wrapping Up with a Burst of Flavor
As you bring this culinary adventure to a close, remember that every hearty bowl of poha is more than just a meal—it’s an exploration of rich tradition and vibrant regional flavors. Throughout the post, we've uncovered key insights on selecting fresh, quality ingredients, mastering the perfect balance of spices, and embracing simple cooking techniques that elevate a classic breakfast to new heights.
Key takeaways include:
- Using locally sourced produce to enhance authenticity
- Following clear, step-by-step guidance for optimum texture and taste
- Experimenting with regional spices to add a unique twist
Now is the perfect time to head back to your kitchen and try your hand at crafting a delicious poha dish. Gather your essentials, follow the proven methods outlined, and let your creativity shine. Whether you’re cooking for family or savoring a quiet morning in your New Delhi kitchen, this recipe promises to deliver both comfort and culinary inspiration.
Embrace the challenge, take actionable steps, and enjoy the rewarding process of creating a beloved breakfast staple
Foodie Profiles

How to Prepare Brinjal Masala (Baigan Masala)
Step into the vibrant world of Brinjal Masala, where culinary art meets cultural tradition. This dish is not only a flavourful treat but also a celebration of time-honored recipes passed down through generations. In bustling urban centers like New Delhi, Brinjal Masala has become a beloved staple, known for its rich aroma, tantalizing blend of spices, and deep-rooted cultural significance.
In this guide, you will explore how to create a perfect balance of textures and flavours, highlighting the humble brinjal’s versatility. By learning the essential techniques, you'll unearth practical tips for tuning the spice levels to suit your taste and adapting the recipe for seasonal ingredients. Key takeaways include:
- Understanding the role of indigenous spices and fresh ingredients.
- Adapting your cooking process to enhance local flavours.
- Embracing the traditions that have shaped this timeless dish.
Prepare to embark on a culinary journey that not only teaches you the art of creating Brinjal Masala but also enriches your cooking experience with cultural insights and actionable tips for a delightful kitchen adventure.
7 Must-Have Ingredients for Authentic Brinjal Masala
- Fresh Brinjals (Eggplants):
Choose firm and glossy brinjals that are free from blemishes. Their tender flesh soaks up the spices, making them the star of this rich dish. - Aromatic Onions:
Sliced onions form a robust base, releasing a subtle sweetness as they caramelize. Their natural flavour enhances the overall complexity of your masala. - Ripe Tomatoes:
Use fresh, juicy tomatoes to create a tangy and smooth gravy. Their acidity balances the spices while lending a vibrant color to the dish. - Ginger and Garlic Paste:
A potent duo that brings warmth and a subtle zing. This blend is essential for building the layered flavour profile that defines traditional Brinjal Masala. - Dried Red Chilies and Turmeric:
These spices not only add heat and color but also deliver a depth of flavor that ties all the ingredients together. - Coriander Powder:
Enhances the masala with a fresh, citrusy note. Its balanced flavour helps to harmonize the dish’s aromatic profile. - Fresh Cilantro and Mustard Oil:
Garnish with cilantro for a burst of herbal freshness and drizzle a little mustard oil to inject a regional twist, especially popular in kitchens across New Delhi.
Mastering Brinjal Masala: A Step-by-Step Journey
Embark on a cooking adventure where the humble brinjal transforms into a richly spiced masala. This guide walks you through each stage of the process to ensure a delectable dish that's perfect for any meal.
- Begin by washing brinjals . Then little fry the brinjals by putting little hot oil and then remove and set aside.
- Heat a generous portion of oil in a deep pan. Once hot, add finely chopped onions, Sauté until the base turns golden and aromatic then put ginger garlic paste
- Introduce traditional spices such as turmeric, red chili powder, and cumin to the mixture. Stir well to allow the spices to bloom.
- Add the fried brinjals to the pan. Sauté for about 5 minutes until they start to soften, absorbing the fragrant spices.
- Mix in diced tomatoes and a pinch of salt. Allow the ingredients to simmer; this helps in developing a rich, well-integrated flavor profile.
- Keep stirring gently until the brinjals are tender and the masala reaches a saucy consistency.
- Finish with a sprinkle of fresh coriander and serve hot with your favorite bread or rice.
This method offers a comforting dish that fits beautifully into the dynamic culinary scene of New Delhi and beyond.
Common FAQs About Making Brinjal Masala
Q1: What makes brinjal masala unique?
Brinjal masala beautifully melds the savory softness of eggplant with a rich blend of spices. The dish’s layers of flavor are achieved by sautéing onions, garlic, and tomatoes before adding tender brinjal pieces.
Q2: How should I prepare the brinjals?
It is best to cut the brinjal into even pieces and lightly salt them beforehand to remove excess moisture. This technique helps in softening the texture while retaining flavour.
Q3: How do I balance the spices effectively?
Achieving the right spice balance involves adding turmeric, red chili, and coriander gradually. Allowing each spice to sauté ensures that their flavours develop without overpowering the dish.
Q4: Can I adjust the heat in the masala?
Yes, tweak the amount of fresh green chillies or red chili powder to suit your taste. Experimenting with these adjustments leads to a personalized balance of heat and flavour.
Q5: Any tips for enhancing the final taste?
Finish with fresh coriander and a squeeze of lemon juice. These simple touches brighten the dish, making it a delightful regional specialty for kitchens in New Delhi and beyond.
Serving and Elevating Brinjal Masala Flavour
Discover creative ways to serve your Brinjal Masala that transform a simple dish into a mouthwatering experience. Embrace the versatility of baigan by pairing it with freshly steamed rice, warm chapatis, or even a crispy dosa for an innovative twist. Elevate the flavour profile with a few simple enhancements that bring out the best in every bite.
Key tips include:
- Fresh Herbs: Garnish with finely chopped coriander or mint to add a burst of freshness.
- Spice Layers: Drizzle a hint of tangy tamarind or squeeze a dash of lemon juice before serving, providing a delightful zing that cuts through the richness.
- Texture Play: Consider adding toasted nuts or a sprinkle of chaat masala for an extra crunch that elevates the mouthfeel.
- Regional Appeal: For those in urban centers like New Delhi, incorporating locally sourced spices can connect the dish with a regional culinary identity.
By implementing these serving ideas, home cooks can transform a traditional meal into a well-balanced culinary masterpiece that invites both visual appeal and deep, harmonious flavours.
Unlocking the Power of Brinjal: A Nutritional Marvel
Discover how this versatile and vibrant vegetable not only enhances your Brinjal Masala but also nourishes your body with essential nutrients. Brinjal, commonly known as eggplant, is a nutritional powerhouse that can boost overall health through its rich content of vitamins, minerals, and antioxidants. Its inclusion in your diet is an excellent way to fortify your meals, whether you're preparing a traditional baigan masala in a cozy New Delhi kitchen or experimenting with contemporary fusion recipes.
Brinjal is naturally low in calories and high in dietary fiber, promoting healthy digestion and aiding in weight management. You can reap its benefits by incorporating brinjal into your weekly meal plans, as it offers a range of health advantages:
- Rich in Antioxidants: Helps combat oxidative stress and inflammation.
- Supports Heart Health: Contains nutrients that may aid in reducing cholesterol levels.
- Enhances Digestion: High fiber content supports a smooth digestive process.
By integrating brinjal into your culinary practices, you not only create a flavourful experience but also invest in your long-term well-being. Embrace the versatility of brinjal and let its rich nutritional profile empower your everyday cooking adventures.
Concluding Your Culinary Journey
Reflect on the rich flavours and techniques showcased in this guide, where tradition meets modern culinary creativity. This recipe not only highlights the perfect balance of spices and tender baigan but also encourages personalized tweaks to suit your taste. To elevate your brinjal masala experience, consider these additional serving ideas:
- Layer flavors: Add a drizzle of tempered mustard seeds or a sprinkle of fresh coriander.
- Experiment with texture: Serve with a side of lightly sautéed greens or crunchy papads.
- Global twist: Mix in a touch of tangy yogurt or coconut milk for a subtle richness that resonates with local palates, especially in bustling areas like New Delhi.
As you wrap up your culinary adventure, remember that every ingredient invites creativity. Begin by revisiting each step, testing small alterations, and refining seasonings until the dish uniquely reflects your style. Embrace the experimental spirit, knowing that every trial sharpens your skills. Ready your kitchen for the next inspiration, and let this versatile brinjal masala become your canvas for endless delightful variations. Enjoy the Brinjal / Baigan masala
Foodie Profiles

Exploring the Perfect Paneer Tikka Recipe with Foodie Profiles Team :
Paneer Tikka offers an exquisite introduction to the vibrant world of Indian cuisine. Born from a rich culinary heritage, this dish has evolved from its historical roots in royal kitchens to becoming a celebrated favorite in local eateries across New Delhi and beyond. Steeped in tradition, Paneer Tikka is renowned for its juicy, marinated paneer chunks grilled to perfection, blending smoky char with a burst of tangy spices.
In this section, you will delve into the origins and evolution of Paneer Tikka, exploring how centuries-old techniques merge with modern grilling methods to create a dish that excites both the palate and the senses. Prepare to uncover:
- Cultural Heritage: A glimpse into the history that makes this dish unique.
- Flavour Explosion: An insight into the blend of spices and techniques used.
- Grilling Mastery: Practical tips for achieving that perfect smoky finish.
Join with Foodie Profiles Team as we embark on this culinary journey to understand why Paneer Tikka continues to captivate food enthusiasts, offering a delicious balance of tradition, innovation, and flavour.
Step-by-Step Guide to Crafting Authentic Paneer Tikka at Home
Begin your culinary journey with a hands-on guide to making exquisite Paneer Tikka right at your home. This detailed tutorial transforms traditional recipes into a modern, accessible format, perfect for food enthusiasts seeking a flavourful adventure.
- Begin by cutting paneer into uniform cubes and preparing a vibrant marinade. Mix yogurt with ginger-garlic paste, red chili powder, turmeric, and a dash of lemon juice. Tip: Allow the paneer to marinate for at least an hour, enhancing the flavour absorption.
- Preheat your grill or oven to medium-high heat. Arrange the marinated paneer on skewers alongside colorful bell peppers and red onions and tomato . Best Practice: Soak wooden skewers in water beforehand to avoid burning.
- Grill the skewers for 10-12 minutes, turning periodically to ensure an even char and perfect caramelization. In bustling culinary hubs like New Delhi, precision and timing can elevate the dish’s robust flavors.
- Finally, garnish with fresh coriander and a squeeze of lime juice before serving. This step-by-step approach not only simplifies the cooking process but also guarantees a delicious and aromatic plate of Paneer Tikka that will impress any foodie.
7 Must-Have Ingredients for Crafting Authentic Paneer Tikka
- Fresh Paneer:
Opt for high-quality, homemade paneer that boasts a soft texture and mild flavor, serving as the perfect canvas for absorbent marinades. - Thick Yogurt:
A rich, full-fat yogurt acts as the base of your marinade, tenderizing the paneer and infusing it with a tangy zest essential for an authentic taste. - Ginger-Garlic Paste:
This robust blend of ginger and garlic not only deepens the flavor profile but also enhances the overall aroma of your dish. - Signature Spices:
Incorporate red chili powder, turmeric, and garam masala to create a balanced spice mix that brings warmth and vibrancy to every bite. - Lemon Juice:
A squeeze of fresh lemon juice adds a burst of acidity, helping marry the spices and brighten the rich flavors. - Vegetable Chunks:
Include bell peppers and onions and Tomato for a delightful crunch, offering a colorful complement to the paneer. - Aromatic Finishing Touch:
A drizzle of oil and a sprinkle of kasuri methi elevate the paneer tikka to an irresistible, aromatic finish.
Grilling Perfection: Unleashing the Ultimate Paneer Tikka Texture
Elevate your paneer tikka experience with proven tips and grilling techniques designed to perfect both texture and taste. Begin by selecting fresh paneer and preparing a marinade that combines yogurt, a blend of aromatic spices, and a hint of citrus to naturally tenderize the cheese. For a truly mouthwatering outcome, allow the paneer to soak in this flavorful mix for at least two hours before it meets the grill.
Key techniques include:
- Preheating the Grill: Ensure your grill, whether charcoal or gas, reaches an even high temperature. This step locks in moisture and creates the sought-after smoky caramelization.
- Strategic Placement: Arrange the paneer cubes evenly, avoiding overcrowding to maintain consistent heat exposure.
- Timed Flipping: Rotate pieces intermittently to achieve uniform char and an ideal texture without sacrificing tenderness.
Additionally Foodie Profiles Team advise to consider incorporating local spice nuances, inspired by culinary hubs like New Delhi, for an authentic flare. These practices not only enhance your paneer tikka’s flavour profile but also help you overcome common grilling pitfalls. Master these techniques and transform your kitchen into a vibrant space for culinary creativity.
Paneer Tikka FAQ: Tips & Tricks for a Flavor-Packed Experience
Q1: How can I achieve a perfectly grilled Paneer Tikka indoors?
For indoor grilling, use a hot griddle or oven broiler. Preheat your equipment and brush the paneer with a little oil to prevent sticking. Ensure even heat distribution for that characteristic char.
Q2: What are some creative variations for Paneer Tikka?
Experiment with spice blends like garam masala, turmeric, and smoked paprika. You can also add bell peppers, onions, or tomatoes to the skewers for extra color and flavor.
Q3: How long should I marinate the paneer?
A minimum of 30 minutes is recommended, though marinating for up to 2 hours allows the paneer to absorb more flavors, enhancing its taste and texture.
Q4: What serving suggestions work best?
Serve your Paneer Tikka with a side of fresh mint chutney, lemon wedges, and a crisp salad. Warm naan or rice can also complement the dish beautifully.
Q5: Can I bake paneer instead of grilling?
Yes, baking at 200°C for about 15-20 minutes can yield a delightful result, offering a softer texture while still retaining the signature spices.
Q6: How do I prevent the paneer from crumbling?
Ensure the paneer is cut into uniform cubes and lightly coated in oil before marination, helping maintain its shape during cooking.
Savoring the Journey of Homemade Paneer Tikka
As you wrap up your culinary adventure, take a moment to relish the art of creating a delectable Paneer Tikka right in your own kitchen. The process of marinating soft paneer cubes in a blend of aromatic spices and skewering them for a perfect char has proven both a creative and rewarding experience. By experimenting with various spice mixes and grilling techniques, you unlock layers of flavor and discover the versatility of this traditional dish.
Foodie Profiles Team again remind you Key insights to remember include:
- Spice Experimentation: Try different combinations of turmeric, cumin, and coriander to deepen the flavour profile.
- Marination Tips: Allow the paneer to marinate for at least a couple of hours to thoroughly absorb the spices.
- Grilling Techniques: Adjust your grill’s heat levels to achieve both a smoky exterior and tender interior.
- Presentation Flair: Garnish with fresh herbs to enhance not only taste but also visual appeal.
Embrace these actionable steps and continue to innovate in your kitchen.
Foodie Profiles

Paneer Butter Masala (Restaurant Style) – Creamy, Rich & Easy !Foodie Profiles
Paneer Butter Masala is one of India’s most-loved North Indian curries—creamy tomato gravy, buttery aroma, and soft paneer cubes that soak up all the flavor. This restaurant-style version is simple enough for home cooking and tastes amazing with naan, roti, or jeera rice.
Quick Recipe Info
- Cuisine: North Indian
- Course: Main
- Prep time: 15 minutes
- Cook time: 25 minutes
- Total: 40 minutes
- Serves: 3–4
- Spice level: Medium (easy to adjust)
Ingredients
For the gravy base
- Tomatoes – 4 medium (roughly chopped)
- Onion – 1 large (sliced)
- Cashews – 12–15 (or 2 tbsp cream as backup)
- Ginger – 1 inch
- Garlic – 5–6 cloves
- Green chilli – 1 (optional)
- Butter – 2 tbsp
- Oil – 1 tbsp
- Cumin seeds – ½ tsp
Spices
- Kashmiri red chilli powder – 1½ tsp (for color, mild heat)
- Coriander powder – 1 tsp
- Garam masala – ½ tsp
- Turmeric – ¼ tsp
- Salt – to taste
- Sugar/honey – ½ tsp (balances tomatoes)
Finishing
- Fresh cream – 2–3 tbsp (adjust to taste)
- Kasuri methi – 1 tsp (crushed)
- Paneer – 250g, cubed
- Water – as needed
How to Make Paneer Butter Masala (Step-by-step guide by Foodie Profiles Team
Step 1: Cook the tomato-onion mix
- Heat 1 tsp oil + 1 tbsp butter in a pan.
- Add onion, sauté 2–3 minutes.
- Add ginger, garlic, green chilli, sauté 30 seconds.
- Add tomatoes + cashews + salt, cook until tomatoes turn soft (8–10 minutes).
- Cool slightly, then blend to a smooth puree.
Step 2: Make the gravy
- In the same pan, heat 1 tbsp butter + 1 tsp oil.
- Add cumin seeds.
- Add the blended puree and cook 6–8 minutes on medium until it thickens and butter starts to separate slightly.
- Add turmeric, coriander powder, Kashmiri chilli powder, mix well.
- Add ½–¾ cup water to adjust consistency. Simmer 3–4 minutes.
Step 3: Finish like a restaurant
- Add sugar, garam masala, and kasuri methi.
- Add fresh cream and stir gently.
- Add paneer cubes and simmer 2–3 minutes only (don’t overcook or paneer gets chewy).
- Turn off heat. Rest 5 minutes for best flavor.
Pro Tips for the Best Taste (Foodie Profiles style)
- Use Kashmiri chilli powder for that bright restaurant color without making it too spicy.
- Don’t boil paneer too long—just warm it through.
- If your tomatoes are too sour, the ½ tsp sugar is the secret fix.
- For extra richness: add 1 tbsp more butter at the end (optional, but very “dhaba-style”).
What to Serve With Paneer Butter Masala
- Butter naan, tandoori roti, or phulka
- Jeera rice or steamed basmati rice
- Onion salad + lemon + a simple raita
FAQs
1) Can I make paneer butter masala without cream?
Yes. Replace cream with milk (a few tablespoons) or curd (whisked, on low flame). Taste will be slightly different but still delicious.
2) Why does paneer become rubbery?
Paneer turns rubbery when overcooked. Add it at the end and simmer only 2–3 minutes.
3) How to make paneer butter masala less spicy?
Use less green chilli, reduce red chilli powder, and add more cream to mellow the heat.
4) Can I use store-bought paneer?
Yes. If it’s hard, soak cubes in warm water for 10 minutes, then drain and use.
5) How long can I store paneer butter masala?
Store in the fridge for 2 days. Reheat gently on low flame; add a splash of water if it thickens.
Foodie Profiles

Veg Biryani Recipe (Hyderabadi-Style, Easy at Home) | Foodie Profiles
Veg biryani is a fragrant, layered rice dish made with basmati rice, spiced vegetables, herbs, and whole spices. This version is India-style dum biryani—big flavor, totally doable on a stove.
Make fragrant, restaurant-style Veg Biryani at home with basmati rice, mixed vegetables, and biryani spices. Step-by-step dum method + tips for perfect long grains.
Quick Info (Recipe Card)
- Prep time: 20 minutes
- Cook time: 35–40 minutes
- Total time: ~1 hour
- Servings: 4
- Cuisine: Indian
- Best for: Lunch, dinner, parties
Ingredients
For rice
- Basmati rice – 2 cups
- Water – for boiling
- Salt – 1½ tsp
- Bay leaf – 1
- Green cardamom – 2
- Cloves – 3
- Cinnamon – 1 small stick
- Shahi jeera (caraway) or cumin – ½ tsp
- Oil or ghee – 1 tsp
For vegetables + masala
- Oil – 2 tbsp + Ghee – 1 tbsp (or use only oil)
- Onions (thin sliced) – 2 large
- Ginger-garlic paste – 1½ tbsp
- Green chilli – 1–2
- Tomatoes (chopped) – 2 medium
- Mixed vegetables – 3 cups (carrot, beans, peas, cauliflower, potato)
- Curd (thick) – ¾ cup (whisked)
- Mint leaves – ½ cup
- Coriander leaves – ½ cup
- Lemon juice – 1 tbsp
Spices
- Turmeric – ½ tsp
- Red chilli powder – 1 tsp
- Coriander powder – 2 tsp
- Garam masala – 1 tsp
- Biryani masala – 1–1½ tsp (optional but great)
- Salt – to taste
Whole spices (for masala)
- Bay leaf – 1
- Cinnamon – 1 small
- Cloves – 4
- Cardamom – 3
- Star anise – 1 (optional)
For layering
- Fried onions (from above) – keep ½
- Saffron milk (optional): saffron + 3 tbsp warm milk
- Rose water or kewra (optional) – 1 tsp
- Ghee – 1 tbsp
Step-by-Step guide by Foodie Profiles Team : How to Make Veg Biryani
Step 1: Wash and soak rice
- Rinse basmati rice until water runs clear.
- Soak 20–25 minutes (gives long grains).
Step 2: Cook rice 70% (important!)
- Boil water with salt and whole spices (bay leaf, cardamom, cloves, cinnamon, shahi jeera).
- Add soaked rice and cook until 70% done (grain breaks with a little bite).
- Drain and spread rice on a plate for 5 minutes.
Step 3: Make crispy onions (birista)
- Heat oil + ghee in a heavy pot.
- Add sliced onions and fry on medium until golden-brown.
- Remove half for layering (this is your biryani “magic”).
Step 4: Cook the veg masala
- In the same pot, add whole spices (bay leaf, cinnamon, cloves, cardamom).
- Add ginger-garlic paste + green chilli; sauté 1 minute.
- Add tomatoes; cook till soft.
- Add turmeric, chilli powder, coriander powder, garam masala, biryani masala.
- Add mixed vegetables + salt. Mix well.
- Add whisked curd, mint, coriander, lemon juice.
- Cook covered 8–10 minutes until veggies are just tender (not mushy).
Step 5: Layer and Dum (steam) the biryani
- Lower the heat. Spread the veg masala evenly.
- Add a layer of rice.
- Top with: fried onions, mint/coriander, saffron milk, rose/kewra (optional), and 1 tbsp ghee.
- Add another rice layer if needed and repeat toppings.
Dum method (stove):
- Cover tightly (use foil under lid if your lid is loose).
- Cook on low heat 20 minutes.
- Rest 10 minutes before opening.
- Gently fluff from sides (don’t break rice).
Pro Tips for Perfect Veg Biryani by Foodie profiles Team
- 70% rice is the #1 secret—fully cooked rice becomes sticky on dum.
- Use thick curd to avoid watery masala.
- Don’t overcook vegetables—biryani should have texture.
- For stronger biryani aroma: add 1 tsp ghee at the end and rest 10 minutes.
What to Serve With Veg Biryani
- Onion raita / cucumber raita
- Lemon wedges + onion salad
- Papad + pickle
FAQs
How do I keep veg biryani rice grains separate?
Soak basmati, cook only 70%, and drain immediately. Also avoid stirring after layering.
Can I make veg biryani without biryani masala?
Yes. Use garam masala + whole spices + extra mint/coriander. Taste will still be excellent.
Can I make veg biryani in a pressure cooker?
Yes—cook masala first, layer rice, add minimal water, and dum on very low heat. (If you want, I’ll format an exact pressure-cooker version too.)
How long does veg biryani last in the fridge?
2 days in an airtight box. Reheat with a splash of water on low heat.
Foodie Profiles

Masala Dosa Recipe (Crispy, Restaurant-Style) | Foodie Profiles
Crispy masala dosa is a South Indian classic: a thin, golden dosa filled with spiced potato masala and served with chutney + sambar. This version is made for Indian kitchens, with simple ingredients and clear steps.
Make crispy, restaurant-style Masala Dosa at home with an easy potato filling and step-by-step dosa tips. Perfect for Indian breakfast—served with chutney and sambar.
Quick Summary
- Prep time: 20 min (plus batter fermentation if making at home)
- Cook time: 30–35 min
- Serves: 3–4 (about 8–10 dosas)
- Best result tip: Hot tawa + thin spread + ghee = crisp dosa
Ingredients
For Dosa Batter (use homemade or store-bought)
If you already have batter, jump to the potato masala.
Homemade batter (classic):
- Raw rice – 2 cups
- Urad dal (split) – ½ cup
- Poha (optional, for crispness) – ¼ cup
- Fenugreek (methi) seeds – ½ tsp
- Salt – to taste
- Water – as needed
Short method note: Soak 4–6 hours, grind, ferment 8–12 hours (warm place), then add salt.
For Potato Masala (Dosa Filling)
- Potatoes (boiled, peeled, mashed roughly) – 4 medium
- Onion (sliced) – 2 medium
- Green chilli – 2 (adjust)
- Ginger (finely chopped) – 1 tbsp
- Curry leaves – 10–12
- Mustard seeds – 1 tsp
- Urad dal – 1 tsp (optional, for crunch)
- Turmeric – ½ tsp
- Salt – to taste
- Oil – 2 tbsp
- Water – ¼ to ½ cup (to make masala soft)
- Coriander leaves – 2 tbsp
- Lemon juice – 1 tsp (optional)
For Making Dosa
- Dosa batter – as needed
- Ghee or oil – 1–2 tsp per dosa (ghee = best crisp)
- Butter (optional) – for “hotel-style” taste
How to Make Masala Dosa (Step-by-Step guide by Foodie Profiles Team)
Step 1: Make the Potato Masala
- Heat 2 tbsp oil in a pan.
- Add mustard seeds; let them splutter.
- Add urad dal (optional) and roast 10–15 seconds.
- Add curry leaves, ginger, green chilli, then onions. Sauté until onions turn soft and light golden.
- Add turmeric + salt.
- Add mashed boiled potatoes and mix.
- Add ¼–½ cup water to make it soft (this helps spreading inside dosa).
- Finish with coriander + lemon juice (optional). Keep warm.
Step 2: Heat the Tawa (this decides crispness)
- Use a cast iron tawa if possible.
- Heat on medium-high until a few drops of water sizzle and evaporate fast.
- Lightly grease and wipe with a tissue/halved onion for an even surface.
Step 3: Spread the Dosa Thin
- Pour a ladle of batter in the centre.
- Spread quickly in circles from centre to outside (thin layer = crisp).
- Drizzle ghee/oil on edges and a little on top.
Step 4: Cook Until Golden + Crisp
- Cook on medium heat until:
- edges lift on their own
- dosa becomes golden-brown
- For extra crisp: cook 30–45 seconds more after it looks done.
Step 5: Add Filling + Fold
- Place potato masala in the centre.
- Fold into half (or roll like a cone).
- Serve hot with chutney + sambar.
Pro Tips (Foodie Profiles Style)
- Batter consistency: should flow like thick buttermilk—not watery.
- Crispy dosa trick: spread thin, use hot tawa, and don’t flip.
- If dosa sticks: tawa isn’t seasoned or is too cold. Heat well and lightly grease.
- For restaurant aroma: add ghee + a tiny bit of butter on the dosa at the end.
What to Serve With Masala Dosa
- Coconut chutney
- Tomato/onion chutney
- Sambar
- Filter coffee (optional but perfect)
FAQs
1) Why is my dosa not crispy?
Common reasons: batter too thick, tawa not hot enough, spread is too thick, or too little fat. Spread thin and use a properly heated tawa with a little ghee.
2) Can I make masala dosa with store-bought batter?
Yes. Store-bought batter works well in India. Just adjust consistency with a little water if it’s very thick.
3) Should I flip dosa?
No—traditional dosa is cooked on one side only. It stays crisp and cooks fully because it’s thin.
4) How long can potato masala be stored?
Keep in the fridge for 2 days in an airtight box. Reheat with a splash of water.
5) What oil is best for dosa?
Ghee gives best flavour and crispness. Otherwise use neutral oil (sunflower/groundnut).
Foodie Profiles

EASY KHOYA GULAB JAMUN RECIPE (Traditional) by Foodie Profiles Team
Short description:
Soft, melt-in-the-mouth khoya (mawa) gulab jamun soaked in lightly scented sugar syrup—perfect for festivals and family celebrations.
INGREDIENTS (makes about 18–22 small jamuns)
For jamun dough:
1 cup tightly packed khoya/mawa, grated (about 200 g)
2 tbsp maida / all-purpose flour (about 15 g)
1–2 tbsp milk, as needed (15–30 ml)
1/4 tsp baking soda (or 1/2 tsp baking powder)
1 tsp ghee (about 5 g) + extra for greasing
A pinch of cardamom powder (optional)
For sugar syrup:
1 1/2 cups sugar (about 300 g)
1 1/2 cups water (about 360 ml)
4–6 green cardamom pods, lightly crushed
1 tsp rose water OR 8–10 saffron strands (optional)
1 tsp lemon juice (helps prevent crystallization)
For frying:
Ghee or neutral oil, for deep frying (enough to cover jamuns)
Quick notes (traditional success tips):
• Use fresh, soft khoya—dry khoya makes cracks.
• Syrup should be warm (not boiling) when you add fried jamuns.
• Fry on low heat for even cooking and color.
PREP (10 minutes)
- Grate the khoya/mawa and keep it at room temperature for 10 minutes.
- Lightly grease your palms with ghee.
MAKE SUGAR SYRUP (10–12 minutes)
- In a wide pan, add sugar + water and heat on medium until the sugar dissolves.
- Add crushed cardamom and simmer 6–8 minutes until the syrup is slightly sticky.
- Turn off heat. Mix in rose water or saffron and lemon juice.
- Keep the syrup warm (not boiling).
MAKE DOUGH (5–7 minutes)
- In a bowl, add grated khoya, maida, baking soda (or baking powder), cardamom powder (if using) and 1 tsp ghee.
- Mix very gently—do not knead hard.
- Add milk 1 tbsp at a time just until the mixture comes together into a soft dough.
SHAPE JAMUNS (8–10 minutes)
- Divide into small portions and roll into smooth balls.
- Remove any cracks by rolling lightly between greased palms.
- Keep the balls covered with a cloth so they don’t dry out.
FRY (12–15 minutes)
- Heat ghee/oil on low flame.
- Test oil: drop a tiny piece of dough—it should rise slowly.
- Add jamuns in small batches.
- Fry on low heat, stirring gently, until evenly golden-brown.
- Remove and rest 1 minute.
SOAK (2 hours)
- Add the warm fried jamuns to the warm syrup.
- Soak at least 2 hours (best 3–4 hours).
- Serve warm or at room temperature.
SERVING IDEAS
• Serve with a few strands of saffron or chopped pistachios.
• Pairs great with vanilla ice cream (optional).
FAQ : Answered by Foodie Profiles team
FAQ 1: Why do my khoya gulab jamun crack while frying?
Most often the khoya is dry or the dough is over-mixed—use soft fresh khoya, add milk only as needed, and roll smooth crack-free balls with lightly greased palms.
FAQ 2: Why do gulab jamun become hard or chewy?
Usually the oil is too hot or the dough is too tight—fry on low heat so they cook through slowly, and mix gently (don’t knead) with just enough milk to bring the dough together.
FAQ 3: Why are my gulab jamun raw from inside?
This happens when the oil is too hot or the jamuns are too big—keep the flame low, fry longer with gentle stirring for even browning, and make small, uniform balls so the center cooks through.
FAQ 4: Why do my gulab jamun shrink after frying?
This usually happens when the dough is too dry or rested uncovered—use soft khoya, add milk only until the dough just comes together, keep balls covered, and soak the jamuns in warm (not boiling) syrup soon after frying.
FAQ 5: Why is my gulab jamun not soaking up sugar syrup?
Usually the syrup is too thick or too cold, or the jamuns were added while very hot—keep syrup warm and thin, let fried jamuns rest 1–2 minutes, then soak for 2+ hours for best absorption.
FAQ 6: Why is my sugar syrup crystallizing for gulab jamun?
Crystals form when syrup is overcooked or sugar sticks to the pan sides—dissolve sugar fully, simmer only to a light sticky (one-string) stage, avoid stirring after it starts simmering, wipe down pan sides with a wet brush, and add 1 tsp lemon juice to help prevent crystallization.
FAQ 7: Can I make khoya gulab jamun without baking soda?
Yes—use 1/2 tsp baking powder instead; the jamuns may be slightly denser, so keep the dough soft and fry on low heat for even cooking.
FAQ 8:How do I store gulab jamun, and how long do they last?
Store in an airtight box fully covered with syrup; keep up to 5–7 days in the fridge, and reheat by warming gently with a spoon of syrup so they stay soft.
FAQ 9 :Can I freeze khoya gulab jamun?
Yes—freeze the fried (unsoaked) jamuns in a single layer, then store in an airtight box up to 2 months; thaw to room temp and soak in warm, thin sugar syrup for 2–3 hours before serving.
FAQ 10 :How do I reheat gulab jamun without making them hard? Warm them gently—either microwave 15–25 seconds with 1–2 tbsp syrup in the bowl, or heat on the stove on low for 2–3 minutes; avoid boiling so they stay soft and spongy.
Nutrition guide:
Here’s an approx nutrition guide by Foodie Profiles Team for Easy Khoya Gulab Jamun (Traditional) (values vary by khoya, size, and syrup absorption).
Per 1 small gulab jamun (about 1 piece from a batch of 18–22):
- Calories: 140–190 kcal
- Carbs: 18–26 g (Sugars: 12–20 g)
- Fat: 6–10 g (Saturated fat: 3–6 g)
- Protein: 2–4 g
- Fiber: 0–1 g
- Sodium: 20–60 mg
Per 2 pieces (typical serving):
- Calories: 280–380 kcal
- Carbs: 36–52 g
- Fat: 12–20 g
- Protein: 4–8 g
Foodie Profiles

How to Make Aloo Puri (Aloo puri Recipe)
Step into the world of Aloo Puri, a beloved classic that has won the hearts of Indian families for generations. This humble yet flavorful dish pairs soft, floury puris with spiced, tender potatoes, creating a satisfying meal that brings comfort and celebration to the table. As you explore this guide, you'll learn how the dish has evolved over time and why it remains a staple in households, from roadside dhabas in New Delhi to family kitchens across India.
Aloo Puri’s popularity can be attributed to its simplicity and adaptability. Designed to satisfy both everyday cravings and festive occasions, it provides a perfect balance of taste and texture. In this section, you will uncover with Foodie Profiles Team:
- The origins and cultural significance of Aloo Puri.
- Practical techniques for achieving perfectly puffy puris and well-seasoned potatoes.
- Actionable tips for replicating an authentic flavor profile using locally sourced ingredients.
Embrace this culinary journey as a gateway to understanding traditional Indian cuisine. Whether you’re a seasoned cook or a budding enthusiast, these insights will inspire and equip you to recreate a dish that is both timeless and heartwarming.
Top 7 Essential Ingredients for Aloo Puri & Aloo Ki Sabji
Kickstart your culinary adventure with these seven indispensable ingredients that lay the foundation for a delightful Aloo Puri and Aloo Ki Sabji experience:
- Premium Wheat Flour
Choose freshly milled whole wheat flour to ensure soft, puffy puris. Its quality influences the texture and taste, making every bite a celebration of tradition. - Hearty Potatoes
Select firm, starchy potatoes that absorb flavors beautifully. Their smooth texture forms the backbone of Aloo Ki Sabji, offering comforting, homestyle appeal. - Aromatically Rich Spices
Incorporate turmeric, red chili powder, cumin, and coriander. These essential spices deliver a balanced heat and depth of flavor that infuse every dish with a burst of authentic taste. - Fresh Aromatics
Ginger, garlic, and green chilies are must-haves. They provide a robust aroma and zesty kick, elevating the overall dish. - Tangy Tomatoes and Onions
These vegetables create a luscious base for the sabji, bringing a subtle sweetness and tang that harmonizes the spice mix. - Quality Cooking Oil
A light, high-smoke point oil is crucial for frying puris to perfection without absorbing excess grease. - Vibrant Fresh Herbs
Garnish with crisp coriander leaves to add brightness and freshness, echoing the vibrant food scenes found in New Delhi.
Mastering the Art of Bedmi Puri Preparation
Embark on an exciting culinary journey with Foodie Profiles Team by creating delightful Bedmi Puri with a systematic approach that guarantees an authentic taste. Begin by preparing your dough: mix high-quality whole wheat flour, a pinch of salt, and water until a smooth, pliable consistency is achieved. Rest the dough for at least 30 minutes to allow the gluten to relax, ensuring a softer final texture.
- Soak and grind a selection of split black gram lentils until they reach a thick, smooth consistency. Add traditional spices like cumin, fennel seeds, and a hint of turmeric for that signature flavor.
- Combine the lentil paste with finely chopped green chilies and coriander is key—mix thoroughly to create the Bedmi filling.
- Portion the dough and roll out circles, stuffing each with a spoonful of the spiced lentil mixture. Seal and gently flatten.
- Fry the puris in hot oil, maintaining a medium temperature to guarantee even cooking and a crisp exterior.
Tip: Work in a warm kitchen, such as those found in New Delhi’s culinary scene, to achieve ideal dough consistency. Enjoy a rewarding process that transforms simple ingredients into a festive treat.
Elevate Your Culinary Skills: Step-by-Step Guide to Aloo Ki Sabji by Foodie Profiles team
Immerse yourself in the art of creating a delightful Aloo Ki Sabji, a dish that transforms simple potatoes into a flavorful, comforting meal. This guide walks you through each stage, ensuring even novice cooks can achieve remarkable results perfect for pairing with puri or steamed rice.
- Preparation & Sauté: Begin by peeling and cubing fresh potatoes. In a heavy-bottomed pan, heat a generous amount of oil and add a teaspoon of cumin seeds until they start to crackle. Then, mix in finely chopped onions, garlic, and ginger for a fragrant start.
- Spice Infusion: Sprinkle turmeric, red chili powder, and ground coriander over the sautéed mixture. Stir thoroughly to let the spices coat the potatoes evenly, igniting a warm, aromatic flavor profile.
- Simmer for Perfection: Add a splash of water, cover the pan, and let the potatoes simmer until tender. Stir occasionally, crushing a few pieces to thicken the gravy naturally.
- Finishing Touches: Season with salt, garnish with freshly chopped coriander, and finish with a squeeze of lemon juice to brighten the dish.
This practical, step-by-step approach not only enhances your cooking expertise but also celebrates traditional flavors that resonate throughout kitchens in New Delhi and beyond.
Frequently Asked Questions on Aloo Puri Challenges
Q: How do I ensure my puris puff up perfectly?
A: Achieving a perfect puff starts with a well-kneaded and rested dough. Ensure the dough is neither too thick nor too thin. Preheat your oil thoroughly for immediate puffing on contact. Stretch the dough evenly and maintain a consistent thickness for uniform results.
Q: What can I do if my aloo filling turns out too watery?
A: The key is to properly drain the boiled potatoes and let them cool before mashing. Avoid overcooking the filling with excess water and add spices gradually to manage moisture levels.
Q: Why does my dough crack during frying?
A: Cracking often occurs due to insufficient resting time or an imbalance in moisture. Allow the dough to rest for at least 30 minutes and consider a slight adjustment in water-to-flour ratio.
Q: How can I balance the spices in the aloo filling effectively?
A: Mix in spices such as cumin, coriander, and a hint of garam masala slowly. Taste frequently and adjust seasoning as needed to create a harmonious flavor profile that complements the potato texture.
Q: What common mistakes should I avoid for best results?
A:
- Overworking the dough
- Using cold oil
- Skipping the resting phase
Each of these can negatively impact the texture and flavor of your Aloo Puri.
Savoring the Journey of Homemade Aloo Puri
Wrapping up, the process of crafting Aloo Puri from scratch is both fulfilling and delicious, offering a rewarding culinary experience that touches the senses. Throughout the guide, you learned how to balance spices, prepare the crispy puris, and create a savory potato filling that elevates every bite. As you master this recipe, keep these actionable tips in mind:
- Preparation is key: Organize your ingredients and follow the step-by-step process to achieve the perfect texture.
- Experiment with spices: Fine-tune the balance to suit your palate, ensuring each element contributes to a harmonious flavor.
- Embrace local flavors: Incorporate fresh, locally sourced produce to enhance the authenticity of your dish.
With every step with Foodie Profiles Team, you build not just a meal but a connection to cherished culinary traditions. Whether you're cooking in a bustling urban kitchen or a cozy home in New Delhi, each attempt brings you closer to mastering this art form. Trust in your skills, enjoy experimenting, and let your passion guide you to further culinary adventures. Happy cooking and may your kitchen always be filled with the delightful aroma of freshly made Aloo Puri!
Foodie Profiles

How to Make Authentic Dal Makhani
Discovering the Heart and Heritage of Dal Makhani with Foodie Profiles team:
Step into the story of Dal Makhani, a dish that has nurtured generations with its rich taste and cultural heritage. Born in the kitchens of North India, this hearty lentil stew carries the soulful warmth of traditional cooking methods passed down through families. Originating from the rural heartlands and perfected in urban dining halls throughout New Delhi and beyond, Dal Makhani is cherished for its slow-cooked flavors and creamy texture, delivering comfort in every spoonful.
This dish is more than just a meal—it encapsulates centuries of culinary evolution where spices, butter, and slow-cooked lentils come together in perfect harmony. As you explore the art of making authentic Dal Makhani, you will learn with Foodie Profiles Team:
- How traditional cooking techniques enhance texture and flavor
- The role of locally sourced ingredients in achieving authentic taste
- Practical tips on balancing spices for that signature creaminess
Embracing Dal Makhani means cherishing a legacy of flavor, tradition, and innovation. Whether you’re refining your kitchen skills or exploring regional dishes, this guide offers actionable insights, transforming your culinary journey into a celebration of India’s timeless food heritage.
Top 7 Must-Have Ingredients for Authentic Dal Makhani
- Whole Black Lentils & Kidney Beans: Start with 1 cup of whole black lentils and ½ cup of red kidney beans. These pulses provide the hearty base for a rich texture. If unavailable, substitute with pinto beans for a similar effect.
- Tomatoes: Use 2-3 medium ripe tomatoes for a natural tang. Fresh tomatoes offer a cleaner taste, but you can opt for high-quality canned tomatoes as a reliable alternative in busy urban areas like New Delhi.
- Aromatic Spices: Essential spices include 1 teaspoon cumin seeds, a couple of bay leaves, and a pinch of red chili powder. These create a well-balanced flavor profile, crucial for authentic taste.
- Ginger & Garlic Paste: A tablespoon each of fresh ginger and garlic paste blends into the sauce, adding warmth and depth.
- Butter & Cream: Add 2 tablespoons of butter and 3-4 tablespoons of cream to achieve velvety richness. For a lighter version, low-fat yogurt works as a suitable substitute.
- Kasuri Methi: A teaspoon of dried fenugreek leaves enhances the fragrance, giving your dish that signature authentic finish.
- Optional Herbs: Fresh coriander not only adds color but also a burst of freshness to complete your Dal Makhani experience.
Step-by-Step Guide to Crafting Traditional Dal Makhani by Foodie Profiles Team
Embark on a flavorful journey by mastering the art of preparing an authentic dal makhani. This step-by-step guide breaks down each stage into simple, practical steps, ensuring your dish turns out creamy, aromatic, and perfectly balanced.
- Begin by soaking whole black lentils and kidney beans overnight. This ensures even cooking and soft texture. Rinse thoroughly before use.
- In a heavy-bottomed pan, heat clarified butter and toast whole spices for a deep, infused flavor. Add finely chopped garlic, ginger, and green chilies to build the aromatic base.
- Pour in the soaked lentils and beans with enough water, then simmer slowly over low heat. Stir occasionally to prevent sticking.
- Once the lentils soften, incorporate tomato puree and a measured blend of spices including cumin, coriander, and a hint of garam masala. Simmer until flavors meld.
- Finalize with a generous splash of cream and fresh cilantro to elevate richness and brightness.
For the best results, cook over low heat, allowing ample time for flavors to develop fully. This technique, rooted in traditional methods from regions like New Delhi, transforms a humble dish into a culinary masterpiece. Enjoy the process and savor every spoonful of this comforting classic!
Elevate Your Dal Makhani Experience with Pro Tips
Discover how slight tweaks and well-planned variations can bring your Dal Makhani to life, offering a robust flavor profile and an enticing texture that leaves an impression. Start with the basics—soak the lentils overnight to ensure a creamier consistency during slow cooking. As you simmer, add a handful of butter and cream gradually for a rich, velvety finish that resonates with traditional recipes, particularly cherished by local food enthusiasts in New Delhi.
For enhanced flavor, consider these actionable tips of Foodie Profiles Team:
- Lightly roast cumin seeds and dried red chilies before adding them to the dal.
- Incorporate a touch of kasuri methi towards the end of cooking for a unique, aromatic twist.
- Experiment by layering in variations like adding diced tomatoes or a splash of tangy yogurt to balance the spices.
When ready to serve, garnish with fresh coriander and an extra drizzle of cream to accentuate both the taste and texture. Whether enjoyed as a hearty main course or a comforting side dish, your refined Dal Makhani is set to impress every palate.
Frequently Asked Questions on Dal Makhani Preparation
Q: What essential steps ensure authentic Dal Makhani?
A: Start by soaking whole urad dal and rajma adequately, then use a pressure cooker to soften the lentils. Sauté onions, ginger, garlic, and spices thoroughly for a deep, layered flavor before simmering the cooked lentils.
Q: How can I achieve the signature creaminess?
A: Incorporate a generous amount of butter and cream during the final stages of cooking. Consistent stirring and slow simmering allow the flavors to meld, enhancing the rich texture.
Q: What are some effective ingredient substitutions?
A: If fresh cream is unavailable, you can substitute with yogurt or coconut milk for a slightly different twist. Adjust spices according to taste without compromising on quality.
Q: How do I balance spices for the perfect flavor?
A: Experiment with a small batch, gradually adding garam masala, cumin, and red chili powder until you find the ideal mix. Taste frequently and adjust for the desired heat and tang.
Q: How long should I simmer the dal for the best result?
A: A slow simmer of at least 30 minutes allows time for flavors to develop fully, producing a truly authentic and comforting dish.
Savor the Journey to Dal Makhani Mastery with Foodie Profiles Team
Reflect on the process and embrace the art of crafting a truly authentic dal makhani. Throughout the guide, we distilled the essence of this beloved dish into actionable steps that highlight the importance of slow cooking, precise spice balancing, and allowing flavors to meld beautifully over time. Here’s a compact recap of the core techniques:
- Preparation: Soak black lentils and kidney beans thoroughly, then rinse to remove impurities.
- Cooking: Simmer the dal on low heat with tomatoes, ginger, garlic, and a blend of traditional spices until you achieve a rich, velvety texture.
- Finishing Touch: Incorporate generous amounts of butter and cream for an indulgent flavor finish, and simmer additional minutes for perfection.
These steps are not just about following a recipe; they empower home cooks to experiment with their own twist. Whether you're making dal makhani for a cozy family dinner in New Delhi or hosting a gathering, refining these techniques can elevate your culinary creations. Step into your kitchen with confidence, put your personal spin on this classic, and enjoy the rewarding journey of transforming everyday ingredients into an extraordinary dish.
Happy cooking!
Foodie Profiles

Mastering Tandoori Chicken at Home
A Journey into Tradition: The Rich Legacy of Tandoori Chicken
Embark on an engaging culinary exploration that unveils the secrets behind a dish steeped in history and unforgettable flavor. Tandoori Chicken, celebrated across urban hubs such as New Delhi, has evolved into an emblem of both rustic heritage and modern cooking prowess. This introduction sets the stage for your culinary adventure, offering insights into its enduring cultural significance and the time-honored techniques that have been passed down through generations.
Here’s what you’ll uncover with Foodie Profiles Team:
- Historical Roots: Discover how ancient cooking traditions shaped the distinctive smoky and tangy flavors.
- Cultural Impact: Understand how Tandoori Chicken has become a staple in festive gatherings and communal dining experiences.
- Practical Adaptation: Gain actionable tips on adapting traditional marination and tandoor techniques for a home kitchen setting.
Dive into a narrative that not only educates but also inspires you to master a dish that blends heritage with innovation. Prepare to learn how simple ingredients and careful techniques transform into a culinary masterpiece, offering a taste of authenticity that resonates with both local and global palates.
Top 7 Essential Ingredients for Authentic Tandoori Chicken
Discover the secret elements that elevate your Tandoori Chicken from ordinary to extraordinary. Each component contributes not only to deep, rich flavors but also to the traditional texture and vibrant color that define this classic dish.
- Premium Chicken Cuts: Opt for bone-in pieces such as thighs or drumsticks, which absorb the marinade for enhanced tenderness and juiciness during slow cooking.
- Thick Greek Yogurt: A rich, creamy base for your marinade, yogurt tenderizes the meat while imparting a tang that harmonizes the spice blend.
- Signature Tandoori Masala: This aromatic spice mix, composed of cumin, coriander, fenugreek, and paprika, creates an unmistakable flavor profile that pays homage to the dish’s heritage.
- Fresh Ginger-Garlic Paste: Essential for a robust base, this paste infuses a zesty lift, balancing the richness of other ingredients.
- Lemon Juice: A splash of lemon not only adds brightness but also enhances the marinade’s penetration into the meat.
- Red Chili Powder: Provides the classic heat and vivid color, making your dish visually appealing and delightfully spicy.
- Authentic Mustard Oil: Concludes the marinade with a smoky, pungent note, capturing the traditional essence of Tandoori cooking.
Ignite Your Culinary Adventure with Foodie Profiles team
Embark on a flavorful journey that transforms your kitchen into a mini tandoor. This step-by-step guide breaks down the process of preparing authentic tandoori chicken at home. Follow these steps to achieve a perfect, smoky flavor with a tender bite that resonates with traditional spice profiles.
- Marinate the Chicken: Cut chicken pieces and create a marinade with yogurt, lemon juice, garlic, ginger, and a blend of spices like cumin, coriander, and garam masala. For an extra punch, add a touch of red chili powder. Allow the chicken to rest in the marinade for at least 4 hours, ideally overnight, ensuring every piece absorbs the aromatic flavors.
- Prepare the Cooking Surface: Preheat your grill or oven to a high temperature. If using a conventional oven, set it to broil for a charred effect reminiscent of a tandoor.
- Cook to Perfection: Place the marinated chicken on the grill or in a roasting pan. Cook until the outside is charred and smoky while the inside remains juicy.
- Finishing Touches: Garnish with fresh cilantro and a squeeze of lemon. Enjoy this dish as a standout centerpiece for a family meal or festive gathering in vibrant local communities like New Delhi.
Elevate Your Tandoori Chicken: Expert Tips for Ultimate Flavor and Texture
Unlock the secret with Foodie Profiles Team to impressive homemade Tandoori Chicken with these expert tips that balance tradition and innovation. Begin by preparing a generous marinade that combines yogurt, lemon juice, garlic, ginger, and a dynamic mix of spices like cumin, turmeric, and red chili powder. These ingredients not only tenderize the meat but also create a vibrant flavor profile that lingers with each bite.
Here are a few actionable tips by Foodie Profiles Team to perfect your dish:
- Marinate Thoroughly: Allow the chicken to rest in the marinade for at least 6-8 hours, ensuring every piece absorbs the spices.
- Temperature Control: Use medium-high heat whether grilling or broiling to achieve a beautifully charred exterior while keeping the inside moist.
- Add a Smoky Finish: For an extra layer of flavor, lightly smoke the chicken using charcoal or a smoking gun technique.
- Local Ingredients Matter: In regions like New Delhi, fresh, locally sourced spices can elevate the overall aroma and taste.
Implementing these techniques will help you create a Tandoori Chicken that’s juicy, aromatic, and bursting with well-balanced flavors every time. Enjoy the process and the delicious results of your culinary mastery!
Expert FAQs for Achieving Perfect Tandoori Chicken at Home
Q1: How can I ensure my Tandoori Chicken stays juicy?
Achieving tenderness starts with proper marination. Use a yogurt-based marinade enriched with ginger, garlic, and a blend of traditional spices. Ensure you marinate the chicken for at least 4 hours, or ideally overnight, to lock in moisture.
Q2: What are the must-have spices in a Tandoori marinade?
Essential spices include red chili powder, turmeric, and garam masala. A squeeze of lemon juice and a dash of smoked paprika also enhance the flavor profile, making each bite aromatic and well-balanced.
Q3: Should I use a grill or oven for cooking?
Traditional charcoal grills give an authentic smoky touch, but a conventional oven set at high heat can replicate a tandoor effect effectively. Adjust cooking times accordingly for even heat distribution.
Q4: How do I prevent my chicken from drying out?
Keep an eye on the cooking process. Baste regularly with marinade, and avoid overcooking by using a meat thermometer to check for a safe Internal temperature without sacrificing juiciness.
Q5: Can local ingredients elevate the recipe?
Absolutely. Sourcing fresh produce and locally produced spices, especially in vibrant culinary hubs like New Delhi, enhances flavor authenticity and supports regional traditions.
Nourishing Flavors: The Health Benefits and Perfect Pairings of Tandoori Chicken
Delve into the wholesome benefits of Tandoori Chicken as you explore a healthier twist on one of your favorite dishes. This protein-rich delight, marinated in yogurt and aromatic spices, not only fuels your body but also tantalizes the palate. The fermentation in the yogurt adds a dose of probiotics that aid digestion, while the vibrant spices like turmeric, cumin, and coriander work together to boost your metabolism and support overall wellness.
When preparing Tandoori Chicken at home, consider these key nutritional highlights:
- High Protein Content: Excellent for muscle repair and sustained energy.
- Digestive Support: Probiotic elements from the yogurt contribute positively to gut health.
- Antioxidant Boost: Spices bring essential antioxidants that help combat oxidative stress.
For a complete meal, serve Tandoori Chicken with:
- Fresh Side Salads: Mixed greens or simple cucumber-tomato salads enhance the dish’s freshness.
- Warm Flatbreads: Naan or whole-wheat roti complements the robust flavors.
- Herbal Sauces: A mint or coriander chutney adds a zesty finish.
- Lemon Wedges: A squeeze of lemon brightens every bite.
Embrace this recipe in your New Delhi-inspired kitchen and enjoy a meal that is both nutritious and satisfying.
Savor Your Journey: Final Thoughts on Tandoori Chicken Innovation
In wrapping up your culinary adventure with Foodie Profiles Team, remember that the art of Tandoori Chicken is as much about exploring bold flavors as it is about perfecting technique. Throughout the recipe, you’ve discovered how vibrant marinades and unique spice combinations come together to create a dish that’s both comforting and exciting to the palate. Now is the time to experiment with your own twist on traditional methods and enjoy the satisfaction of handmade excellence.
Key takeaways include:
- Focus on Marination: A well-balanced marinade with yogurt, lemon juice, and exotic spices forms the flavor backbone.
- Control Your Heat: Whether you’re grilling in a backyard setup or using a home ovens, master the temperature to lock in juiciness.
- Experiment with Local Ingredients: Leverage local flavors, especially if you’re cooking in bustling cities like New Delhi, to add regional authenticity to your creation.
Take these actionable steps to refine your technique further. Embrace creativity, don’t be afraid to add personal touches, and let each attempt bring you closer to mastering a unique, unforgettable Tandoori Chicken.
Happy cooking!
Foodie Profiles

Irresistible Chilli Potato Recipes
The Spark Behind Chilli Potato Magic
Discover the incredible versatility of chilli potatoes—a dish that has captured hearts across diverse kitchens. Instead of merely being a side, these spicy potato creations stand as a favorite comfort food, celebrated for their robust flavors and adaptability. Whether you’re looking for a snack to energize a busy day or a satisfying meal to relish with family, chilli potatoes deliver a punch of flavor with minimal effort.
In this guide, you'll explore with Foodie Profiles Team:
- Creative flavor pairings: Learn how to seamlessly blend chilli spices with tender potatoes to create a dish that's as bold as it is comforting.
- Step-by-step techniques: Understand the process from selecting the right type of potatoes to perfectly balancing spiciness for an irresistible taste.
- Regional twists: Discover tips on incorporating local ingredients from areas like New Delhi to elevate your culinary game.
Embrace practical insights, actionable cooking tips, and inspiring ideas that will help you craft a dish suitable for casual dinners and lively gatherings alike. Get ready to transform simple potatoes into a culinary masterpiece that not only satisfies your cravings but also ignites your creativity in the kitchen.
7 Essential Ingredients & Techniques for Exceptional Chilli Potatoes
- Select the Right Potatoes
Choose starchy potatoes that crisp up well during frying. Parboil them lightly to soften and ensure they absorb the chilli marinade evenly. - Master the Chilli Base
Use a balanced mix of red chilli powder, fresh green chillies, and paprika to achieve the perfect heat. This blend forms the heart of the dish’s flavor profile. - Embrace Aromatic Spices
Integrate cumin, coriander, and turmeric to add depth and warmth. These spices not only enhance flavor but also lend a vibrant color to the dish. - Prepare a Zesty Marinade
Combine lime juice, garlic, and ginger to create a tangy base that tenderizes the potatoes. This step is crucial for melding flavors. - Achieve the Ideal Texture
Fry or sauté the potatoes until they’re crisp on the outside while remaining tender inside. The contrast is key to a satisfying bite. - Infuse with Fresh Herbs
Sprinkle chopped cilantro and mint to brighten the dish, enhancing its aroma and visual appeal. - Final Touch of Local Flair
Tailor your presentation by incorporating regional ingredients, perfect for enhancing taste in vibrant local markets like New Delhi.
Savor Every Bite: Creative Serving Suggestions for Chilli Potatoes by Foodie Profiles Team
Elevate your chilli potato dish to a full culinary experience by exploring bold, well-balanced pairings. The spicy kick of chilli potatoes pairs best with options that bring a refreshing contrast while complementing its robust flavor. An enticing serving idea is to combine these potatoes with a crisp side salad tossed in a zesty lemon dressing to offset the heat and intensify the flavor profile.
Consider the following pairing ideas:
- Light and creamy dips: A cooling yogurt or mint chutney dip helps balance the spiciness.
- Crunchy vegetable slaws: Fresh cabbage, carrots, and cucumbers add texture and brightness.
- Hearty breads: Enjoy with warm naan, garlic bread, or even toasted pita to soak up every morsel of sauce.
For those in vibrant culinary hubs like New Delhi, local pickles or a tangy tamarind sauce can offer an extra layer of complexity. Experimenting with these options not only turns a simple dish into an impressive meal but also provides practical tips for a balanced, satisfying culinary adventure focused on flavorful snacks and easy Indian recipes.
Frequently Asked Questions About Chilli Potato Delights
What type of potatoes works best in chilli potato dishes?
Choosing the right potato is crucial. Starchy potatoes, like russet or Idaho, yield a fluffy interior and crispy exterior when fried or roasted, making them ideal for absorbing bold spices.
How can I adjust the heat level in my chilli potatoes?
Spice control is key. To customize, you can:
- Reduce the chilli powder or red pepper flakes for a milder flavor
- Add a dash of sweet paprika to balance the heat
- Incorporate tangy elements like lemon juice for extra zest
What are some popular variations for chilli potato recipes?
Experiment with regional twists by:
- Mixing in diced bell peppers and onions
- Adding garlic and ginger for an extra kick
- Finishing with fresh coriander or mint, especially popular in places like New Delhi
How do I achieve a perfect crispy texture?
For optimal crunch, consider:
- Parboiling potatoes before frying
- Coating with a light dusting of cornstarch
- Double frying to lock in crispiness
Can these recipes be prepped in advance?
Yes, you can prepare the spice blend and even partially cook the potatoes ahead, then finish cooking when ready to serve for a quick, satisfying snack.
Wrapping Up Your Chilli Potato Journey with Foodie Profiles Team
As you conclude your exploration into creating mouthwatering chilli potatoes, remember that precision and passion are key. Crafting a perfect dish involves balancing bold spices with tender, fully cooked potatoes to achieve that irresistible taste. By carefully selecting your ingredients, such as high-quality chilli powders, robust spices, and fresh vegetables, you’re well on your way to mastering this easy Indian recipe.
Key takeaways include:
- Ingredient Selection: Fresh potatoes and quality chilli spices create the baseline for that rich, deep flavor.
- Cooking Technique: Slow simmering and proper heat management enhance the natural sweetness and spiciness, ensuring a harmonious blend.
- Presentation: Finish your dish with a garnish for added texture and visual appeal, making it ideal as a hearty snack or side dish in any New Delhi kitchen.
Your next steps involve experimenting with spice ratios and cooking times to suit personal palates while staying true to traditional methods. Embrace these practical tips to elevate your culinary skills and turn everyday ingredients into a dish bursting with flavor and authenticity. Enjoy the creative process and savor every bite!
Foodie Profiles

Brinjal Tawa Fry Recipe
Discover the Essence of a Timeless Indian Classic
Step into the world of flavorful Indian classic food with this deep dive into the art of crafting the iconic brinjal tawa fry / Baigan Bhaji. This recipe has earned its spot as a beloved favorite across local kitchens, including bustling culinary hubs in New Delhi, thanks to its perfect blend of smoky char and aromatic spices. As you embark on this culinary journey, you'll uncover the secrets behind achieving a tawa-fried perfection that highlights the natural texture and taste of tender brinjals.
In this guide, you will learn with Foodie Profiles Team:
- Key Techniques: Mastering tawa heating and seasoning for a consistently crispy exterior.
- Flavor Balancing: How to use common spices and local herbs to enhance the dish’s appeal.
- Step-by-Step Preparation: Easy-to-follow instructions that ensure each segment of the cooking process is executed with precision.
Whether you’re looking to elevate your everyday cooking or establish a deeper knowledge of regional dishes, this introduction sets the stage with actionable tips and insights. Get ready with Foodie Profiles Team to blend tradition with practical culinary skills, ensuring every bite delivers an unforgettable taste of authentic Indian cuisine.
Mastering the Art of Tawa Fry Brinjal with Foodie Profiles Team
Discover how to transform humble brinjals into a mouthwatering, crispy delight with this detailed step-by-step guide. Begin by selecting fresh brinjals from your local market in New Delhi for the best flavor and texture.
- Prep the Brinjals:
- Wash and slice the brinjals evenly.
- Lightly score the slices to help the marinade penetrate.
- Marination Magic:
- In a bowl, combine salt, turmeric powder, and red chili powder.
- Coat each slice thoroughly, ensuring every piece is evenly spiced.
- Allow the brinjals to marinate for at least 15 minutes to absorb the flavors.
- Tawa Temptation:
- Heat a non-stick tawa or skillet over medium heat.
- Drizzle a small amount of oil and place the marinated brinjals in a single layer.
- Cook each side for 3-4 minutes or until they take on a golden, crispy finish.
- Turn gently to preserve the texture and avoid breaking the slices.
Tip: Adjust heat as needed to avoid burning and ensure a perfectly crisped finish. Enjoy this savory, spicy treat as an appetizer or side dish that brings authentic local flavor to your table.
Secrets to Achieve Ideal Texture and Flavor in Tawa-Fried Brinjal
Creating the perfect Brinjal Tawa Fry is all about balancing crispy edges with a soft, flavorful core. Begin by choosing firm, evenly sized brinjals for a consistent cook. Slice the brinjal into thick rounds or strips so that the heat penetrates evenly without overcooking the exterior.
Focus on these essential techniques of Foodie Profiles Team:
- Pre-treatment: Soak the brinjal slices in saltwater to draw out excess bitterness and moisture, which helps maintain a crisp texture.
- Spice Infusion: Marinate with turmeric, red chili powder, and a touch of ginger-garlic paste. This step not only enhances flavor but also contributes to an even coating that caramelizes beautifully on the tawa.
- Cooking Technique: Use medium-high heat and a well-oiled tawa. The key is to allow a controlled sear that locks in moisture without burning the spices.
- Local Tips: In regions like New Delhi, where kitchens are known for quick, high-heat cooking, these tips ensure you get a consistent, restaurant-quality outcome every time.
These practical pointers of Foodie Profiles Team help you unlock the secrets of a perfectly textured and remarkably flavored Brinjal Tawa Fry.
Frequently Asked Questions
What are some creative variations for this dish?
Many cooks experiment with a variety of seasonings and additional ingredients to tailor brinjal tawa fry to their taste. Some popular modifications include sprinkling a pinch of chaat masala or adding finely chopped mint to brighten the flavors. Exploring these variations can transform the dish for a unique twist every time.
How can I adjust the spice level?
Adjusting the spice is straightforward; start with less chili and gradually increase until you achieve your desired heat. For a milder flavor, consider mixing in yogurt or coconut cream during the final stages of cooking.
What are ideal serving suggestions?
This dish pairs delightfully with steamed rice, flatbreads like roti, or even a crisp side salad. In urban food hubs such as New Delhi, it’s popular as both a main course and a shared appetizer during family meals.
Can I incorporate other vegetables?
Yes, adding diced tomatoes or bell peppers enhances both the nutritional value and texture. This customization makes it adaptable to seasonal produce availability.
What is the best method for cooking brinjal?
For an optimal tawa fry, lightly brush brinjal slices with oil and roast them on a hot griddle until edges are crisp, ensuring they retain a soft center.
Savoring the Final Bite: Embrace the Flavorful Journey
As you wrap up your Brinjal Tawa Fry adventure with Foodie Profiles Team, take a moment to appreciate the blend of textures and spices that transform a simple vegetable into an irresistible culinary delight. This recipe not only celebrates the humble eggplant but also invites you to experiment with various seasonings and techniques to suit your palate. Reflect on the key elements—crisp tawa frying, perfectly balanced spices, and a burst of fresh herbs—that collectively elevate the dish.
To maximize your kitchen creativity, consider these next steps:
- Experiment with spices: Try adjusting the levels of turmeric, cumin, and red chili for a personalized twist.
- Explore complementary ingredients: Add a squeeze of lemon juice or a sprinkle of fresh coriander to enhance the flavor profile.
- Optimize cooking techniques: Test different frying methods or cooking durations to achieve the ideal texture.
By embracing these actionable tips, you not only perfect your Brinjal Tawa Fry but also build confidence in adapting traditional recipes. Enjoy the process, share your results, and continue exploring a world of innovative flavors.
Foodie Profiles

Spicy Gravy Momos Recipe
Spices, Steam, and Street Food Cravings: The Rise of Spicy Gravy Momos
Move over, plain dumplings—spicy gravy momos are redefining street food cravings across North Indian cities like Delhi, Lucknow, and Chandigarh. What started as a humble Tibetan import has evolved into a flavor-packed sensation, with steamed or fried momos now dunked into fiery, aromatic gravies that blend red chili, cumin, garlic, and regional spices. This fusion isn’t just a meal; it’s a culinary experience that speaks to the modern Indian palate’s love for heat, texture, and bold contrasts.
For food enthusiasts and home cooks alike, mastering spicy gravy momos means understanding the balance between dumpling integrity and sauce intensity. The key lies in crafting a gravy that’s rich but not greasy, spicy but not overwhelming, and deeply aromatic without masking the filling’s flavor. Whether using chicken, mutton, or plant-based mince, the filling should stay moist inside tender wrappers, while the gravy clings just right—neither too thin nor overly thick.
In this guide, you’ll learn with Foodie Profiles Team how to build layers of flavor, choose the right chilies for heat and color, and avoid common pitfalls like soggy momos or broken sauces. From roadside stalls to apartment kitchens, this dish bridges tradition and trend, making it a must-master for anyone passionate about India’s evolving street food culture.
Crafting the Perfect Spicy Momo Filling and Tangy Gravy: A Flavor-First Guide
Elevating your spicy gravy momos starts with mastering the balance of heat, aroma, and texture in both the filling and the sauce. The foundation of a mouthwatering filling lies in selecting the right protein—typically ground chicken, mutton, or paneer for vegetarians—and combining it with finely chopped aromatics like onions, garlic, ginger, and fresh green chilies. To enhance depth, incorporate ajwain (carom seeds) or garam masala for warmth without overpowering the palate. Keep the mixture moist by adding a touch of oil or yogurt, ensuring your momos stay juicy after steaming.
For the signature tangy gravy, the magic is in the base: onions and tomatoes slow-cooked until caramelized, then blended into a smooth masala. Temper this with mustard oil or ghee, adding cumin and a dash of vinegar or lemon juice to amplify the tang. Regional variations across North India often include a spoon of sattu or besan for thickness, especially in Delhi and Bihar-style gravies. Adjust spice levels with red chili powder or freshly chopped bird’s eye chilies, depending on heat tolerance.
Always sauté spices properly to unlock their essential oils—a step known as baghaar—and simmer the gravy gently to let flavors meld. Serve piping hot with freshly steamed momos for a restaurant-quality experience at home.
Master the Perfect Spicy Gravy Momos at Home: A Step-by-Step Guide
Crafting restaurant-quality spicy gravy momos in your kitchen is easier than you think—with the right technique, you can achieve tender dumplings swimming in a rich, aromatic sauce that rivals your favorite street food stalls in New Delhi or Kolkata. Start by preparing your momos filling: combine finely minced chicken or mutton with grated cabbage, chopped spring onions, fresh ginger-garlic paste, and a pinch of salt and pepper. Mix until the ingredients bind slightly but remain fluffy—overmixing leads to tough fillings.
Roll out round wrappers from scratch using all-purpose flour and warm water, or use store-bought for convenience. Place a teaspoon of filling in the center, then pleat the edges into half-moon shapes, ensuring a tight seal to prevent bursting during steaming. Arrange them in a steamer basket lined with cabbage leaves or parchment to avoid sticking. Steam over boiling water for 10–12 minutes until the wrappers turn translucent and the filling is fully cooked.
For the spicy gravy, sauté onions, ginger, garlic, and green chilies in oil until golden. Add chopped tomatoes and spice blends like garam masala and red chili powder. Simmer into a thick sauce, then stir in a dash of cornflour slurry to achieve a silky, clinging texture. Gently drop steamed momos into the gravy and simmer for 2–3 minutes to infuse flavor.
Pro tip of Foodie Profiles : Serve immediately with fresh coriander and a wedge of lime for a zesty kick. For best results, make momos fresh—reheating can toughen the wrappers.
5 Pro Tips for Perfect Spicy Gravy Momos Every Time
Achieving restaurant-quality Spicy Gravy Momos at home isn’t just about following a recipe—it’s about mastering texture, heat balance, and authentic flavor development. Whether you're in Mumbai, Chandigarh, or Bangalore, these techniques will help you replicate the steaming bowls of jhol momo found in bustling street-side stalls across North India and the Himalayan belt.
- Perfect Your Dough Texture for Soft, Bite-Resilient Wrappers
Use a mix of all-purpose flour and a touch of semolina for structure. Knead with warm water until smooth and let the dough rest under a damp cloth for at least 30 minutes. This prevents shrinkage during wrapping and delivers that signature tender-yet-chewy bite essential for holding spicy broth without tearing. - Control the Spice Gradually to Match Your Palate
Start with a base of Kashmiri red chili powder for color, then layer in finely minced green chilies or a dash of Szechuan peppercorns for heat depth. Toasting whole spices like cumin and fennel before grinding enhances aroma without overwhelming the broth. Always taste as you go—spice levels should build complexity, not dominate. - Simmer the Gravy with Bone-In Meat or Mushroom Stems for Depth
Authentic jhol relies on rich umami. Simmer chicken bones, lamb scraps, or even dried shiitake stems to extract natural gelatin and depth. Strain before adding tomatoes, ginger, and garlic for a clean, flavorful base that clings beautifully to each momo. - Steam, Then Rest to Lock in Juiciness
Overcrowding the steamer leads to sogginess. Steam in batches for exactly 8–10 minutes, then let them sit undisturbed for 2–3 minutes. This allows the dough to set and fillings to reabsorb juices, ensuring every bite bursts with flavor. - Finish with Fresh Herbs and Citrus for Brightness
Just before serving, stir in chopped coriander, a squeeze of lemon, and a sprinkle of roasted cumin powder. This cuts through the richness of the gravy and elevates the dish from hearty to refreshing—true to the street food spirit of Kathmandu and Darjeeling alike.
Got Questions About Spicy Gravy Momos? We’ve Got Answers
What’s the secret to a flavorful spicy momo gravy?
A rich, aromatic gravy starts with a well-balanced base of sautéed onions, ginger-garlic paste, and tomatoes. For authentic depth, temper whole spices like cinnamon, cardamom, and cloves before adding ground cumin and coriander. Adjust heat with red chili powder or fresh green chilies based on your spice tolerance. Simmering the gravy for 15–20 minutes helps concentrate flavors and thicken naturally.
Can I make gluten-free spicy gravy momos at home?
Yes—use rice flour or a gluten-free flour blend to prepare the momo wrappers. Ensure your soy sauce and chili paste are certified gluten-free. When steaming, line the basket with cabbage or banana leaves to prevent sticking without compromising texture.
How do I prevent momo wrappers from tearing during steaming?
Work with soft, pliable dough and rest it covered for at least 20 minutes before rolling. Keep portions uniform and avoid over-filling. Use a rolling pin to create even edges and seal the momos tightly with water. Steam on medium heat—too high can cause rapid expansion and breakage.
What are the best dipping sauces to serve with spicy gravy momos?
Complement the heat with cooling dips like mint-yogurt chutney or tamarind-date sauce. For extra kick, try a fusion garlic-chili mayo or sesame-soy dip. In North East Delhi and similar areas where bold flavors thrive, many prefer a side of pickled radish or lime wedges for tang.
Can I pan-fry or air-fry momos before adding gravy?
Absolutely. Crispy-bottomed momos (known as tandoori momos) absorb gravy beautifully. Pan-fry until golden, then gently toss in warm gravy. Air-fry at 180°C for 10 minutes for a healthier crunch without sogginess.
How long can leftover spicy gravy momos be stored?
Store in an airtight container for up to 2 days in the fridge. Reheat gently on the stove to preserve texture—microwaving may make wrappers rubbery. Freeze uncooked momos for up to a month; cook directly from frozen, adding 2–3 extra minutes to steaming time.
The Joy of Crafting Spicy Gravy Momos at Home
There’s a unique satisfaction that comes from preparing Spicy Gravy Momos in your own kitchen—transforming simple dumplings into a steaming, aromatic comfort meal that rivals any restaurant in New Delhi or Kolkata. By mastering the balance of spicy, tangy, and savory notes in the gravy, you’re not just cooking; you’re curating an experience rooted in Himalayan and North Indian culinary traditions. The key lies in layering flavors: sautéing onions and tomatoes to build depth, infusing the base with spices like cumin, turmeric, and red chili powder, and finishing with fresh coriander and a hint of lemon for brightness.
To ensure success, keep these tips of Foodie Profiles in mind: Always use freshly steamed momos to prevent sogginess, adjust spice levels gradually to match your palate, and let the gravy simmer just long enough to meld flavors without overcooking the dumplings. For those in humid climates like Mumbai or Chennai, store leftover gravy separately and combine only when serving to maintain texture.
Now that you’ve learned the art with Foodie Profiles team, gather your ingredients and invite family or friends to share in the meal. Share your homemade Spicy Gravy Momos during weekend gatherings or monsoon evenings—it’s more than food, it’s connection on a plate. Your kitchen is the heart of tradition; keep the warmth alive, one spicy bite at a time.
Foodie Profiles

Foodie Profiles : Rasgulla Recipe- Soft & Juicy Indian Sweet
The Sweet Heritage of India’s Beloved Rasgulla
Few Indian sweets command the affection and reverence of rasgulla—a spongy, syrup-soaked delight that has become a symbol of culinary pride, especially in the eastern states of West Bengal and Odisha. Revered for its melt-in-the-mouth texture and subtle sweetness, this iconic dessert transcends mere confectionery; it’s woven into the fabric of regional festivals, family celebrations, and temple offerings. In cities like Kolkata and Cuttack, the aroma of boiling chhena balls in sugar syrup is not just a daily ritual but a cultural signature passed down through generations.
Rasgulla’s journey from temple kitchens to national adoration highlights its deep-rooted significance in India’s gastronomic heritage. Unlike many sweets laden with ghee or flour, rasgulla relies on the purity of milk-based chhena and precise technique—offering a lighter indulgence that appeals to modern health-conscious eaters. Mastering it at home means understanding the delicate balance of curdling milk, kneading chhena to the right consistency, and cooking the balls in hot syrup without collapsing their porous structure.
In this guide, you’ll learn with Foodie Profiles team how to recreate authentic, soft, and juicy rasgullas—just like those from traditional sweet shops—with simple tools and reliable methods. From selecting quality dairy ingredients to troubleshooting common texture issues, this deep dive ensures you achieve sweet perfection every time.
Achieve Perfect Rasgulla Texture: From Chhena to Syrup-Soaked Sweets
Mastering soft, melt-in-the-mouth rasgullas at home starts with precision at every stage—from preparing fresh chhena to gently cooking the cheese balls in sugar syrup. Follow this detailed process of Foodie Profiles to ensure fluffy, spongy sweets that soak up just the right amount of syrup without turning rubbery or collapsing.
- Prepare Fresh Chhena with Care
Bring 1 liter of whole milk to a boil, then add 2 tablespoons of lemon juice or vinegar to curdle it. Once the whey separates, drain the mixture in a muslin cloth. Rinse the chhena under cold water to remove any sourness, then hang it for 30–45 minutes to remove excess moisture. Pro tip: In humid climates like Kolkata or New Delhi, speed up draining by placing a light weight on top, but avoid over-pressing to maintain softness. - Knead Until Smooth and Spongy
On a clean surface, knead the chhena for 8–10 minutes until it becomes smooth, lump-free, and slightly sticky. The right texture resembles soft mawa or khoya—this step is crucial for airy, non-dense rasgullas. - Shape Uniform Balls
Divide the dough into equal walnut-sized portions. Roll gently between palms into smooth, crack-free balls. Uneven shaping can lead to inconsistent cooking. - Cook in Warm Sugar Syrup
Prepare a light sugar syrup (1 part sugar to 3 parts water). Drop rasgulla balls into gently simmering syrup and cook on medium-low heat for 15–18 minutes. Keep the lid slightly ajar to prevent bursting. Once cooked, they’ll puff up and float.
Let cool in syrup for 2–3 hours to absorb flavor. The result? Juicy, spongy rasgullas ready to delight any sweet lover.
Perfect Your Rasgulla Game: 7 Must-Have Ingredients & Tools for Soft, Juicy Sweets
Creating restaurant-quality rasgullas at home starts with the right ingredients and equipment—plus a few insider tips to ensure that melt-in-the-mouth texture and balanced sweetness everyone loves. Whether you're in Mumbai, Kolkata, or New Delhi, mastering this classic Bengali dessert hinges on precision and technique.
- Full-Fat Milk (Preferably Fresh)
Use high-quality, full-fat milk for chena (paneer curds). The fat content affects texture—too low, and your rasgullas may turn rubbery. Avoid ultra-pasteurized milk, as it can hinder proper curdling. - Citrus Juice for Gentle Curdling
Lemon juice or green chukka (sour lime) works best to coagulate milk. Add slowly while stirring to get soft, even curds—this prevents graininess and ensures a smooth, pliable chena. - Fine Suji (Semolina) – The Secret Softener
A teaspoon of fine suji kneaded into chena absorbs excess moisture and prevents cracking during shaping and boiling. Don’t skip this—it’s key to crack-free, round balls. - Kneading Board & Muslin Cloth
Use a wooden or marble kneading surface with a tight-weave muslin cloth to strain chena. Squeeze gently under running water to remove whey without over-pressing—this preserves softness. - Heavy-Bottomed Saucepan with Lid
Essential for even syrup distribution and steady boiling. A heavy base prevents scorching, while a clear glass lid lets you monitor expansion without lifting. - Sugar Syrup – Balanced Ratio Matters
Maintain a 1:1 water-to-sugar ratio for ideal penetration. Add cardamom or a saffron strand for regional flair. Cool the syrup slightly before adding rasgullas to prevent breakage. - Chill Before Serving
Let rasgullas soak in syrup for 2–3 hours. Refrigerate before serving for that signature juicy, chilled bite—perfect for warm Indian afternoons.
Your Rasgulla Questions, Answered
How long can I store rasgulla, and what’s the best method?
Rasgulla stays fresh for 2–3 days at room temperature and up to a week when refrigerated. Always store it in its sugar syrup to retain softness and moisture. Use an airtight container and avoid temperature fluctuations, especially in humid regions like Kolkata or New Delhi. For longer storage, freeze the sweets in syrup for up to 3 weeks—just thaw in the fridge before serving.
Can I use paneer instead of chenna to make rasgulla?
Traditional rasgulla relies on chenna—a soft, homemade Indian cottage cheese made by curdling milk. Store-bought paneer is too firm and often salted, which affects texture and flavor. However, if you soften fresh paneer with warm milk and squeeze out excess liquid carefully, it can work in a pinch—just expect slightly denser balls.* Why is my rasgulla syrup too thin or too thick?*
The ideal syrup should coat the back of a spoon lightly—neither watery nor sticky. Start with a 1:1 sugar-to-water ratio. If too thin, simmer the syrup uncovered for 5–7 minutes. If too thick, stir in warm water, one tablespoon at a time. Always cool the syrup slightly before adding rasgullas to prevent them from breaking.
How do I keep my rasgulla soft and spongy?
Knead the chenna gently—overworking creates dense sweets. Shape balls smoothly without cracks, and cook them in warm (not boiling) syrup to prevent sudden expansion. Simmer gently for 10–15 minutes until they double in size. Proper kneading, controlled heat, and syrup temperature are key to juicy, cloud-like texture.
Can I make rasgulla without a pressure cooker?
Yes—use a deep, heavy-bottomed pot with a tight-fitting lid. Ensure the syrup fully covers the balls, and maintain medium-low heat. Monitor water levels to avoid drying out. A steamer basket works well to keep sweets submerged. Cooking may take 2–3 minutes longer than in a pressure cooker.
Do rasgullas need to be served chilled?
While traditionally served at room temperature or slightly chilled, especially in North Indian cities, the choice depends on preference. Cold rasgulla firms up slightly, while room-temperature ones are more springy. Avoid serving too cold, as it dulls flavor.
The Sweet Reward of Homemade Rasgulla: Tradition in Every Bite
There’s a quiet joy in crafting rasgulla at home—soft, syrup-soaked cheese balls that epitomize the warmth of Indian festive traditions. More than just a dessert, rasgulla is a celebration of patience, precision, and the love poured into every step, from chhena preparation to final soaking in fragrant sugar syrup. When made at home, you gain full control over texture, sweetness, and freshness, avoiding the overly dense or artificially flavored versions sometimes found in stores.
This beloved Bengali sweet holds a cherished place during festivals like Diwali, Durga Puja, and weddings across North and East India, where serving homemade rasgulla symbolizes hospitality and cultural pride. By mastering the process—curdling milk just right, kneading chhena to smooth perfection, shaping uniform balls, and boiling them in lightly cardamom-infused syrup—you’re not just cooking, you’re preserving heritage.
To ensure success each time remember following tips of Foodie Profiles:
- Use fresh, full-fat milk for richer chhena
- Avoid over-kneading to prevent hardness
- Maintain a steady simmer, not a rolling boil, for even expansion
- Cool completely in syrup to maximize juice absorption
The result? Delicate, spongy rasgullas that melt in your mouth and bring authentic sweetness to your table. Ready to impress your family or elevate your festive spread? Try your hand at this timeless recipe—your kitchen is the perfect place to honor tradition, one syrupy bite at a time.
Foodie Profiles

Foodie Profiles : Masala Dosa Recipe
The Crispy Cornerstone of South Indian Breakfast Culture
Few dishes capture the soul of South Indian cuisine quite like the masala dosa—a golden, paper-thin crepe with a crisp edge and a soft center, generously stuffed with spiced potato filling. Originating from the food streets of Tamil Nadu and Karnataka, this fermented rice-and-lentil delicacy has evolved from a humble temple offering to a nationwide favorite, now found in homes and eateries from Chennai kitchens to Mumbai breakfast counters. What sets masala dosa apart is its complex fermentation process, which not only delivers that signature tang but also enhances digestibility and nutrient absorption—making it a smart choice for families prioritizing gut health and balanced meals.
Beyond taste, the dosa symbolizes culinary ingenuity. Its preparation—grinding soaked rice and urad dal to a silky batter, allowing it to ferment overnight—reflects generations of kitchen wisdom rooted in Ayurvedic principles. In urban India, where time is scarce, mastering the dosa at home offers a way to reclaim tradition without relying on takeout. This section of Foodie Profiles explores the dosa’s cultural roots, the science behind its fermentation, and why it remains a go-to breakfast for households seeking flavor, nutrition, and heritage on one plate.
7 Must-Have Ingredients & Expert Tips for Perfect Masala Dosa Batter and Filling
Achieving restaurant-style masala dosa at home starts with selecting the right ingredients and mastering fermentation—two critical elements that define texture, flavor, and authenticity across kitchens in South India and beyond. Whether you're in Bengaluru, Chennai, or a home cook in New Delhi experimenting with South Indian staples, these seven essentials will help you craft a crisp dosa and aromatic potato filling every time.
- Urad Dal & Idli Rice – The Fermentation Foundation
Use a 1:4 ratio of split black gram (urad dal) to parboiled idli rice for optimal fermentation. Soak both separately for at least 4–6 hours; this increases yield and fluffiness. Stone-grinding the dal and rice separately yields a lighter, airier batter—common in traditional Tamil Nadu homes—but a high-speed blender works well with added water control. - Fenugreek Seeds – The Fermentation Booster
Add a ½ tsp of methi seeds during soaking. Their natural mucilage improves batter rise and creates those signature lacy edges. Especially effective in cooler Delhi winters where sluggish fermentation is common. - Poha (Flattened Rice) – The Crispness Secret
Incorporate 2 tbsp of soaked poha into the rice before grinding. It enhances fermentation speed and contributes to a golden, crackling crispness—favorite among street vendors in Hyderabad and Coimbatore. - Fresh Ginger & Curry Leaves – Aromatic Depth for Potato Masala
Sautéed with mustard seeds and onions, they form the flavor base of the filling. Fresh curry leaves add a distinct South Indian terroir, while ginger cuts through the starchiness of potatoes. - Golden Potatoes – The Heart of the Filling
Use waxy, medium-starch varieties like baby potatoes or Kufri chips; they hold shape during mashing and avoid gumminess. A light turmeric boil before spicing gives color and aids digestion—a staple in temple kitchens across Karnataka. - Fresh Coconut Chutney – The Flavor Bridge
While not in the filling, it’s essential for serving. Blended raw coconut, roasted chana dal, green chilies, and tempered curry leaves balance the dosa’s crisp acidity and heat. - Fermentation Control – The Climate Hack
Ideal fermentation takes 8–12 hours in warm climates like Kochi. In colder areas, place batter in a preheated (then off) oven with a bowl of warm water. Avoid refrigeration pre-ferment—this stalls yeast activity. A well-fermented batter will be voluminous, sour-scented, and bubbly.
Mastering these elements ensures dosas that are thin, crisp, and full of layered flavor—perfect for weekend brunches or weekday tiffin meals.
Master the Art of Masala Dosa: Ferment, Fill, and Flip to Perfection
Creating an authentic Masala Dosa at home is simpler than you think—once you know the key techniques behind the fermentation, spiced potato filling, and dosa crisping process. Loved across South India and popular in urban kitchens from Bengaluru to Chennai, this golden crepe is all about timing, temperature, and texture. Follow this step-by-step guide to achieve restaurant-quality results without special equipment.
- Prepare the Fermented Batter
Start with a blend of rice and urad dal (black gram), soaked separately for 4–6 hours. Grind each into smooth pastes using stone-ground or wet grinders for best texture. Combine with a small amount of fenugreek seeds—known to aid fermentation—then mix thoroughly. Cover and let ferment overnight (8–12 hours) in a warm spot. In cooler New Delhi homes, place the batter near a pre-warmed oven or in a yogurt maker to encourage natural yeast development. A well-fermented batter will be bubbly, slightly tangy, and double in volume. - Make the Spiced Potato Filling (Masala)
Boil and mash potatoes with mustard seeds, curry leaves, chopped onions, green chilies, turmeric, and fresh cilantro. Sauté the base in coconut oil until onions soften, then add boiled potatoes and mix gently. Avoid over-mashing—small chunks ensure a hearty bite. This masala should be dry to prevent soggy dosas during assembly. - Cook the Perfect Crispy Dosa
Heat a non-stick tawa or cast-iron griddle on medium. Pour a ladle of batter and spread in quick circular motions to form a thin layer. Drizzle oil around the edges for crispness. Once the surface dries and edges lift, add a spoonful of masala down the center. Fold one side over the filling, roll gently, and slide onto a plate while hot. Serve immediately with coconut chutney and sambar for a full South Indian breakfast experience.
Pro Tip of Foodie Profiles: Adjust batter thickness with rice flour or water depending on humidity—thicker in monsoon, thinner in dry winter air.
From North to South: Exploring Regional Twists on the Classic Masala Dosa
The Masala Dosa, while beloved nationwide, transforms beautifully across India’s diverse culinary landscape, with each region stamping its identity through unique fillings, batter fermentation methods, and serving styles. In South India, particularly Tamil Nadu and Karnataka, the traditional urad dal-heavy batter is left to ferment overnight with podi (spice blends) or jaggery to enhance sourness—a technique that creates that signature tangy lift. Meanwhile, in Kerala, coconut milk is often added to the batter, lending a subtle sweetness and helping it ferment faster in the humid coastal climate, resulting in a softer, more pliable dosa.
Up north, in cities like New Delhi and Lucknow, you’ll find creative adaptations influenced by local palates—masala dosas stuffed with spiced aloo jeera, paneer, or even minced keema, reflecting the region’s affinity for rich, aromatic flavors. Street vendors in Mumbai often serve a “cheese dosa,” where cheddar or processed cheese is melted inside, catering to a fusion-loving urban crowd. In Andhra Pradesh and Telangana, the masala is dialed up with fiery red chilies and tempered with mustard seeds and curry leaves, producing a bolder, oil-rich stuffing that pairs perfectly with cooling bottle gourd chutney.
For home cooks looking to experiment, adjusting fermentation time based on your local climate—longer in cooler regions, shorter in tropical zones—can dramatically impact crispness and flavor. Understanding these regional techniques not only deepens appreciation for the dish but also empowers better results, whether you're crafting a crispy Udupi-style dosa or a soft, buttery version from the heartland.
5 Traditional Accompaniments That Perfectly Complement Your Masala Dosa
Elevate your masala dosa experience with these five authentic South Indian sides that bring balance, depth, and regional flair to every bite. Whether you're enjoying a crispy dosa fresh off the griddle in Chennai or recreating the classic street food experience in a New Delhi kitchen, the right accompaniments enhance flavor, aid digestion, and transform your meal into a well-rounded culinary moment.
- Freshly Ground Coconut Chutney
This creamy, aromatic staple blends grated coconut, roasted chana dal, green chilies, and curry leaves for a smooth, mildly spicy condiment that pairs beautifully with the dosa’s crisp texture. The natural sweetness of coconut balances the tangy potato filling, while roasted chana dal adds nuttiness and body. For best results, grind in small batches and top with a tempering of mustard seeds, slit green chilies, and a drizzle of coconut oil—this tadka unlocks bold flavor and extends freshness. - Steaming Hot Sambar
A lentil-based vegetable stew simmered with tamarind, sambar powder, and aromatic spices, sambar provides the ideal savory-umami contrast. Its tangy depth complements the dosa’s neutrality and boosts satiety. Use seasonal vegetables like drumstick, eggplant, or carrots, and garnish with fresh coriander. In Tamil Nadu and Bangalore homes, serving dosa with a side of sambar is non-negotiable—it’s the soul of the meal. - Tangy Tomato Onion Chutney
A simpler alternative to coconut chutney, this onion-tomato blend offers a bright, zesty punch. Sautéed onions, ripe tomatoes, garlic, and red chilies create a relish-like consistency that cuts through richness. Ideal for quick meals, it requires minimal prep and appeals to palates seeking bold acidity—perfect for Hyderabad and Mumbai kitchens favoring strong flavors. - Crisp Medu Vada or Upma
For a heartier breakfast spread, serve masala dosa alongside soft medu vada or fluffy upma. These lentil fritters or semolina porridge add textural contrast and turn a simple dosa into a full plate. In traditional South Indian tiffin meals, this combination ensures sustained energy and satisfies diverse taste preferences. - Cool Buttermilk (Majjige or Chaas)
Finish the meal with a chilled glass of spiced buttermilk. Whisked curd with cumin, curry leaves, and a pinch of asafoetida cools the palate, aids digestion, and balances the spices in sambar and chutney. In hot climates like Coimbatore or Ahmedabad, this probiotic-rich drink is essential for hydration and gut comfort.
Pairing your dosa thoughtfully ensures a balanced, restaurant-quality meal at home—rooted in tradition, optimized for modern taste.
Frequently Asked Questions About Making the Perfect Masala Dosa
Making a flawless Masala Dosa at home can be rewarding, but it often comes with its share of challenges—especially when dealing with fermentation, batter consistency, and preserving texture. Whether you’re a beginner cook in Mumbai, a meal-prepping parent in Bengaluru, or a home chef in New Delhi, these common concerns can impact your dosa experience. Here’s a clear guide to help you troubleshoot and perfect your technique.
Why isn’t my dosa batter fermenting properly?
Poor fermentation is often due to cold temperatures or old ingredients. The ideal environment is warm and draft-free—especially crucial during winter months in North India. Use fresh, high-quality urad dal and rice, maintain a consistent 25–30°C temperature, and soak the lentils for the recommended time. Adding a small amount of fenugreek seeds during soaking can also boost fermentation activity.
My batter is too thick or too thin—how do I fix it?
Batter consistency should resemble a smooth pancake mix: thick enough to spread but fluid enough to form a thin circle. If too thick, gradually add water, one tablespoon at a time. If too runny, let it rest uncovered for 30 minutes to allow excess moisture to evaporate, especially helpful in humid coastal climates.
How long can I store fermented dosa batter?
Refrigerated in an airtight container, fermented batter stays fresh for up to 5 days. Stir well before use, as separation is normal. For longer storage, freeze portions in zip-top bags for up to 3 weeks—thaw in the fridge and bring to room temperature before cooking.
What’s the best way to reheat leftover dosas without making them soggy?
Reheat on a preheated cast-iron tawa or non-stick griddle over medium heat for 1–2 minutes per side. Avoid the microwave, as it makes dosas rubbery. For a crispier texture, lightly smear water on the dull side and cover briefly to steam before crisping again.
Can I make dosa batter without rice for a gluten-free, grain-free option?
Yes—substitute rice with alternatives like quinoa or millets (such as ragi or bajra), but expect slight texture differences. These flours require hydration adjustments and may benefit from a small quantity of psyllium husk to improve binding.
Why do my dosas stick to the pan?
This usually indicates insufficient preheating or excessive moisture in the batter. Always heat the tawa before pouring, and wipe with minimal oil using a cloth. Ensure the batter isn’t overly watery, and test with a small dosa first to gauge heat and spreadability.
More Than Just a Meal: The Lasting Legacy of Masala Dosa in Indian Food Culture
The Masala Dosa is far more than a beloved breakfast dish—it’s a symbol of South India’s culinary brilliance and a celebrated ambassador of regional flavors enjoyed across New Delhi, Mumbai, Bangalore, and beyond. Rooted in the kitchens of Karnataka and Tamil Nadu, this fermented lentil and rice crepe filled with spiced potatoes embodies the harmony of taste, texture, and tradition that defines Indian cuisine. Its cultural significance extends beyond the plate, representing a daily ritual for millions and a staple at weddings, festivals, and bustling street-side stalls from T. Nagar to Connaught Place.
What makes the Masala Dosa a timeless favorite is its balance of nutrition and indulgence. Made from naturally fermented batter, it enhances digestibility and boosts probiotic benefits—key advantages often overlooked in modern cooking. The dosa’s golden crisp exterior gives way to a soft, flavorful interior, perfectly complementing coconut chutney, tangy sambar, and aromatic tomato chutney. It’s also highly adaptable: urban kitchens in Gurgaon and Hyderabad now experiment with multigrain batters, millet infusions, and vegetable-stuffed variations to meet health-focused diets without losing authenticity.
For home cooks, mastering the dosa means embracing patience—from proper fermentation to achieving the right spreadability on a well-heated tawa. Small adjustments, like resting the batter or using aged rice, can dramatically improve results, especially in humid climates.
Ready to elevate your dosa game? Start by preparing a batch of batter at home using urad dal and fenugreek seeds for optimal fermentation. Experiment with fillings—try paneer, mushrooms, or lentil mash—to suit dietary preferences. Share your version with family or post it online to join a growing community celebrating authentic Indian flavors. Let the Masala Dosa inspire not just your meals, but your connection to India’s rich culinary heritage.
Foodie Profiles